3 Spray Nozzles that Quickly Fix Inefficient Irrigation Systems

Posted by Bob Franchetto on Aug 13, 2014 2:24:00 PM

Irrigation systems that are inefficient or stretched can waste a significant amount of water.

In Part 10 of our Drought Solutions video series, you'll discover why the right spray nozzle can greatly increase the efficiency of your customer's irrigation system, the key to using both sprays and rotors on the same system, and a simple way to balance pressure when there's no pressure or volume at the furthest heads.


Video Transcript

We were talking about DU. DU on a sprinkler head. If you get anywhere near 75% - that's distribution uniformity. That's how that one sprinkler head works. You get somewhere near 75%, that's a great, great head.

You take a great sprinkler head at 75% and you put it in a great designed irrigation system. We already know that we can get to 90% water efficiencies. 93%. 95%. That's what we're looking for on every single system.

smarter spray head nozzles slide

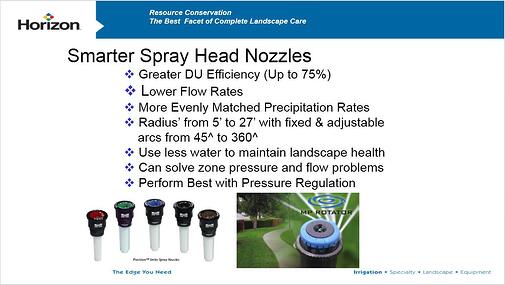
Here's the MP Rotator. Here's the Toro Precision Nozzles. You got the Rain Bird Rotary Nozzles. These are all super efficient sprinkler heads because they are evenly matched precip rates. These are already done for us. It's not like your gear drive rotor.

They're all available in radiuses from about 5' to 27'. You're going to use less water. Like up to a third.

Matching Precipitation Rates of Sprays and Rotors

This has a precip rate of .5" an hour. Same exact precip rate as a gear drive rotor. So now you can mix this spray head with a gear drive rotor on the same system because their precip rates are the same.

Cool opportunity. So now instead of having a gear drive rotor shoot all the way across 3 areas and back, you can put this on and get that smaller area taken care of on the same system.

So you got a precip rate of .5" an hour. what's the standard precip rate rate of a spray nozzle? Fixed arc spray. 1.5" an hour. This is 3 times more efficient. So on stretched or zones that have pressure problems, this is a great retrofit because they use that much less water.

A Simple Way to Regulate Pressure Throughout Your System

How many spray heads do you see on systems? I see systems pop up and there's 40 spray heads on it, especially in medians. You start counting them and you go, man that's gotta have a 4" main sitting underneath it. To get the water all the way down there.

Super, super inefficient systems. A lot of times they're so inefficient, by the time you get to the other end, there's no water.

So let's say there's no water at the other end. Because we've got great pressure here, but by the time we get all the way down there, we don't have any pressure or volume. Because they didn't pipe size. That's a whole other class, but anyhow.

They don't have any pressure at the other end, so what can we do?

On a spray system, if we just go and put PRS stems in. Pressure regulating stems. Now the pressure here, instead of being 80 and it being 10 down at the other end.

Now we just retrofitted that system and it balanced that whole system and made it right.

Now it's 30, 30, 30, 30, 30, and you stretch that pressure down to the other end. Let's go ahead and put something on now that instead of using 1.5" of water an hour, only uses .5" of water.

Now we just retrofitted that system and it balanced that whole system and made it right. This is great for retrofit systems that are stretched. These are great products for that.

When they originally came out, they came out for new installs. New install, new install, new install.

It's like, wait a minute. These are retrofit issues right here. All solved  with one. And not one of these, do you have to pull out a shovel to fix. It's an internal gut change.

If we're going to do the pressure regulator and we're going to do the nozzle, we might as well put the check valve in the bottom. And it's an easy, you just go along and you gut cans. And you just retrofitted a whole system. And the water savings you'll see this afternoon. Huge. Huge water savings.

Click Here for More Drought Solutions
Read More

Topics: Maintenance, Water Conservation, Construction, Drought Solutions

6 Ways an ET Controller Lowers the Cost of Irrigation Systems

Posted by Bob Franchetto on Aug 7, 2014 3:57:00 PM

Irrigation systems that account for changes in Evapotranspiration (ET) can save your customers money in ways you may not have considered.

In Part 9 of our Drought Solutions video series, we'll cover 6 ways an ET controller can lower the cost of irrigating and maintaining a property.


Video Transcript

Benefit #1: Reduced Water Cost

Some of the benefits of ET. We know for a fact that we can save that 20% in water cost just by going to ET.

We're not watering on that straight line. 15 minute, 15 minute, 15 minute, 15 minute. 10 minute, 10 minute, 10 minute. Whatever it is. We're watering on that daily need. Whatever that daily need is.

Benefit #2: Healthier Landscape & Greater Root Structure

You're going to get a healthier landscape because we're watering what we need. You're going to get greater root structure and the reason you're going to get root structure is because deep infrequent watering is better.

If you've got tree roots that are coming up into your turf plots, we've got a watering practice issue. That means we're watering every single day, small cycles and we're not getting good penetration into the soil.

If you get penetration into the soil, and we'll talk about this this afternoon, then your roots will go deeper. Deeper roots, searching for water, healthier roots. Healthier plant, more drought tolerant.

Benefit #3: Reduced Fertilizer Wash Through & Benefit #4: Reduced Storm and Hardscape Damage

You get a reduced fertilizer wash through. Reduced storm and hardscape damage. We don't have sidewalks pushing up because those roots are searching for water way up top. They're going down. You don't have trees falling over because the root structure is down there and got a good anchor.

ET and Proper Scheduling

Benefit #5: Reduced Electrical Cost (if pump equipped)

The number one cost to a landscape is electric usage if there's a pump installed. Do we have any pumps out there? Any pump stations?

If you've got a pump station installed, not only do you have increased pressure - so we got a lot of opportunities to knock down that pressure. Get that pump station set properly.

Pumps a lot of times are, "Oh man, I'm not going to mess with that."

Because your pump guy says, "No, don't mess with that."

No, your pump needs to be putting out what your system needs and that system need, you need to go out to your furthest system with the most heads and we need to do a test to see what is out there and then we need to adjust the pump to fit that parameter.

So if we've got 70 psi at the furthest station and we know we only need 45, we gotta go detune that pump. Your pump guy is gonna tell you, "No, you're not touching my pump. Put a pressure regulator on it."

Pumps should be tuned to match the needs of the irrigation system. Test the pressure at the furthest station and adjust the pump as needed.

No, no, no, no, no. Let's tune your pump. That's a whole other side of the business that gets a little sticky, but pumps have parameters. Let's go set the pump to meet the parameters of your system. It's almost never done.

And they'll start talking their pump curve. If you get too far to the left or to the right of my pump curve, it's gonna be inefficient. OK, so waste all my water and still run that pump at full throttle. Because they like to run their pumps at full tilt.

But that's why we have variable speed motors on our pumps. Variable frequency drives. That's what it's all for. Pump guys won't let you do that, but we can help you get through that.

But that's your number one cost if there's a pump.

Benefit #6: Reduced Pump Maintenance Costs

And then maintenance will be your number two cost. Because pump maintenance isn't cheap. If you gotta pull the pumps out of the hole if it's on a wet well system. Or if you gotta pull pumps, even if it's just on a city system. That's where your costs come in.


Click Here for More Drought Solutions


Read More

Topics: Maintenance, Water Conservation, Construction, Drought Solutions

Sprinkler Spacing 101: How to Avoid Dry Spots and Boost Uniformity

Posted by Bob Franchetto on Aug 5, 2014 3:28:00 PM

When dry spots appear around sprinkler heads in summer, there is often a spacing problem that needs to be corrected.

In Part 8 of our Drought Solutions video series, you’ll discover why you shouldn’t completely trust the manufacturer’s specifications and learn a few approaches that can help you properly space heads.


Video Transcript

If you look at this head, there is a very slight doughnut right here on this densogram. Once again, remember it's in a labratory.

The CU on this system shows up at a 93%. In theory, that would be a phenomenal system. Your DU right here is at 89%. Pretty good CU, pretty good DU in the laboratory situation. But there is a very slight area here of a doughnut.

sprinkler densogram

What that's telling us is that in the wintertime, this system works just fine. As soon as our ET goes up, we're going to start seeing those doughnuts of cure on that site. There is a spacing problem that we need to get out there and correct. And once we correct that spacing problem, those doughnuts go away.

That's called a stretched system. They're out there everywhere and you it said earlier. Why there's a stretched system out there is because our construction crew knows you know what, if I value engineer this and I take out three valves, I'll win that job. I can add one more head here, and one more head there, and one more head here because I know that.

Well yeah, it's overlapped. It's stretched. That doesn't mean it's right.

3 Layout & Uniformity Myths

Myth #1: Coverage doesn't always mean uniformity.

In fact, it usually doesn't. Uniformity has to do with what's in that book. But you gotta remember uniformity in that book is in a laboratory.

Myth #2: Triangle patterns are better than square patterns.

So triangle patterns are not always better than square patterns. The old rule of thumb was I set that up on a triangle spacing. Triangle spacing has way better CU than square spacing.

Not always true. It has to do with the site. It has to do with the turf plot we're watering. It has to do with all those factors that we gotta bring into it.

Myth #3: Head to head coverage is ideal.

A good rule of thumb that I've always used: If you got a system set up on 15' spacing based on catalog numbers, 15' nozzles, space the head about 12'.

Give yourself a little overlap because not one of those spacings that they have listed on those nozzles is out there in the field. Every one of them is in that laboratory under ideal conditions. You've got to set up a little different than what's in there.

The Irrigation Auditors Society through IA, they say give yourself a foot overlap. That's still a little close.

If you're not having to go to the controller and up your run times dramatically and you've got a little bit of an extra overlap on head to head, your systems are going to be more efficient because now we're not stretching them and we got the opportunity to to keep those systems tight. Keep everything rolling together because out there in the environment it's totally different than a laboratory. And you guys know that because you've been out there.


Click Here for More Drought Solutions
Read More

Topics: Maintenance, Water Conservation, Construction, Drought Solutions

The Quickest Way to Improve Distribution Uniformity

Posted by Bob Franchetto on Jul 31, 2014 11:58:00 PM

Are dry spots showing up in your customer's turf? The irrigation system may have a problem with its uniformity.

In Part 7 of our Drought Solutions video series, you'll learn about distribution uniformity (DU) and the coefficient of uniformity (CU) and how to increase the system's uniformity by matching precipitation rates.


Video Transcript

No matter how smart our system is, if our sprinkler heads aren't installed properly, it doesn't matter.

Coefficient of uniformity (CU) is a statistical method of evaluating a system's uniformity. That's how the system is working as a whole.

The CU is all measured on a densogram and it's in a laboratory situation. Every manufacturer's catalog has their laboratory numbers in there. These manufacturers spend millions of dollars on these laboratories where they do the testing of these heads.

They want their numbers to be better than their competitor's numbers. They're spending tons of money. The one thing they're shy on is running this whole thing in a vacuum.

They're in buildings. Absolutely zero humidity. Absolutely zero airflow. They've got these things pinned down to where this is what my sprinkler head does.

So when you're designing or you're reading the charts, just remember that all of those charts are done in a laboratory. These numbers are done in a laboratory. They can tell us some information, but let's make sure that we're not relying on that 1000%. And we'll talk about that a little bit more on spacing.


coefficient of uniformity slide

Dry Spots & Stretched Systems

So your distribution uniformity (DU), that's the spacing. This system is a gear drive rotor system. It's set up on triangle spacing and true to fashion, you've got some dry spots here. You got spots here, dry spots here, you got a big old dry spot here.  

Traditionally we call this a stretched system. Why is it stretched? It's because this sprinkler head is not watering that one over there and that sprinkler head's not watering this one over here. They have to water each other.

Spray system, gear drive rotor system. To get the water to go that far, it has to water itself. I mean it can't water itself. It has to rely on its neighbor to water it. if you don't have at least head to head coverage in those situations, you're gonna get dry spots.

And these dry spots may not show up right now. Man, my system works great 99% of the winter. Summertime come along, my customers aren't very happy. We got doughnuts. Big doughnuts around gear drive rotors. Big doughnuts around spray heads.

The Wrong Way to Fix a Dry Spot

What's the common way to cure a doughnut? How do you fix a doughnut? Out in the field, what's the number one fix? The first thing guys do?

Up the run time. Oop we need more water. Well there goes your 20% savings cause now you're micro flood irrigating instead of having your system set up properly. Let alone the 50%, 60%, 70% more water that you're gonna use by doing stuff like that.

So what these things show us in a laboratory is how the system works in a stretch situation. If you look now, we get over here, the system is getting a little better.

Improving Uniformity with Matched Precipitation Rates

It may be because they're nozzling properly. Ok, beautiful, matched precipitation rate. Pretty cool word. It's even better with gear drive rotors because they give you a whole rack. 1 head, 12 nozzles. That's cool! 12 nozzles. I wonder why I need 12 of them for 1 head?

What happens? Every single head out there has got a #7 nozzle in it. So this little corner and this little corner has got a #7. And this little corner's got a #7.

So if we've got a #7 nozzle here, that's a quarter spray. A #7 nozzle there, that's a half spray. And a #7 there, that's a full spray. What's the problem with that?

That full spray is gonna be a dry spot. That's gonna be a doughnut. You're watering 4 times as much area as this quarter. That's why they give you a rack of 10 nozzles. That's why they give you that book that says, OK if that full circle, if we put up for 4 gallon/minute nozzle in there, that half has to be a 2 gallon/minute nozzle and this quarter has got to be a 1 gallon/ minute nozzle.

They all say they're matched precip rate, but you gotta change the nozzles. They can't all be a #7 nozzle. Let alone a #10 nozzle. A #10 nozzle puts out about 10 gallons/minute.

I can walk onto your sites today and I will start pulling up rotors and they all have the same nozzle in them. I see architects design them with all the same nozzle. Any architects? Design them with all the same nozzle in it. It's like guys, what did you do that for?

With all the same nozzle in them, you're going to get some crazy looking stuff. When you start getting closer to match precip, you're going to get it right.

Match precip rate. Now, on our match precip rate sprays heads, you don't have to do that. They automatically do it. The manufacturer says it's a fixed arc. Here's what it's gonna do. At this arc, here's our precip.  

So MPR - Matched Precip Rates - when they did it in spray heads, it's fine. But in gear drive rotors, it's up to you. It's up to us as water managers.

That's the low hanging fruit that we can grab onto and say, you know I know what's wrong with your system. I mean this quarter over here, I'm up to my ankle in mud and we got a doughnut around that full circle on exactly the same valve. That's the opportunity.


Click Here for More Drought Solutions
Read More

Topics: Maintenance, Water Conservation, Construction, Drought Solutions

3 Irrigation Sensors You Should Already Be Installing

Posted by Bob Franchetto on Jul 30, 2014 5:39:00 PM

Irrigation sensors are water saving plug-ins that can help you quickly fix inefficiencies in existing irrigation systems.

In Part 6 of our Drought Solutions video series, you'll learn the ins and outs of using each sensor, how to save water with seasonal adjustments and daily ET notifications, and where to install your sensor so it operates correctly.


Video Transcript

How many sites do you have that has just something as simple as a rain sensor? All of them? Every site has a rain sensor?

You don't wanna be that guy that's irrigating in the rain. Every single system should have at least a rain shutoff.

They'll react in fog also. It's got a small enough setting on there that if you have a super, super heavy fog day, it won't irrigate. The ET is such that you don't need it that day.

3 sensors that save water

Wind Sensors

How about wind? Pretty windy around here. We get a good onshore breeze.

How many times are you on a site and we're trying to irrigate that way, and that gear drive
rotor or that spray head is pushing as hard as it can that way, and all the water is over here
in the parking lot? Because of the wind.

What if we set up just a little wind sensor? All it does is just like this, it breaks the common wire. Its got highs and lows.

So let's say we got a 15 minute run time. For 15 minutes of that run time that we have on there, 5 minutes it's too windy to put water on that turf plot.

It shuts off the system. It doesn't shut off the controller. The controller still thinks its
running. It just breaks the common wire and it's running.

So now the system is not irrigating. The clock is still running for 5 minutes. You get that gust of wind through. The wind sensor says, "Oh, OK, it's quiet enough now." And it kicks on your system for the additional 10.

Yeah, we did miss 5 minutes of watering that day, but we didn't put it on the parking lot over
here and let it run down the drain as waste.

Question from Audience: Does it record that so you know?

No it does not. But yes it will, if you get a weather station. These are just the littleplug-ins. This is that low hanging fruit that you can solve a quick problem.

Now the other thing is yeah you don't know that. There is no data recorder on this. You don't know that.

That's where as a weekly turf manager, keep an eye on what our turf is doing. Man it's been really, really windy. We may have to change our run times. We can't run anymore at that 6pm window. We gotta put that cycle on. There's no buildings in the way. This thing is out and exposed in front of everybody.

We gotta get that one closer to midnight when the wind is really calmed down. So you may have to adjust that run time from when it is, to a calmer time of the day.

Solar Sensors

There's smart controls like this. Getting a little smarter. Solar click.

This is a product that Hunter has out. It reads solar radiation, it reads rain and it reads humidity. And then it ties that in with the controls and it ties it in with historical data.

So now it's got a little bit of on-site information. It's getting a little more smart. It's not just using historical. It's getting a little smarter. Here's exactly what's going on today. And it makes adjustments that feed into your control on run times.

How to Save Water with Seasonal Adjustments and Daily ET Notifications

These use adjustments based on seasonal adjustment. You know the seasonal adjustment on there?

You set your controller at 100% in July, and then it seasonally adjusts down or up based on
where you're using it.

Found out this week that East Bay MUD, they're not sending out daily ET notifications. On
their news, on all of that, they're not sending out daily ET. They're sending out your
seasonal adjust if 100% is in July.

So then as a homeowner, oh cool, my seasonal adjust should be 58%. 58% seasonal adjust. It adjusts all the run times on the controller. That's how they're doing it to make it easier.

I get a push notification every day from AZMAT. Every single day, I get a push notification
for high quality turf, medium quality turf, and low quality turf and what my daily ET should
be.

So today we used 0.25" of water for high quality turf. And if you don't care because it's that
retention basin out in the back. To keep it alive, it's gonna be a 0.18". High quality, low
quality turf.

So we've got those daily ETs coming in. You just plug it in and away you go. Do the little math calculator.

Installing Your Sensor in the Right Location

These sensors. All of these sensors. Location, location, location, location I had a guy ticked off at me, "Even with this rain sensor, we still watered in the rain."

"OK, what did you do? Where did you put it?"

"Put it right by the controller."

Alright, sure enough. Controller right there. Beautiful install. Little cable, censor right there. Problem is eaves of the house.

It's like dude, really? Do I really have to come out here and say it's gotta get to the rain.

Most of these devices are wireless now. You don't even have to have a wire. You just put the device out there where it can get to the rain.

Same with this one. This one reads solar radiation. Had a guy, the system didn't shut off for two weeks.

"Man, my customer is really, really mad. His water bill is through the roof and I found out
the controller still hasn't shut off. It's been running for two weeks."

I go, "How long has it been since you've been there?"

"Well, I noticed it but..."

"Why are you calling me two weeks later?"

He put the sensor on the southwest facing wall of a stucco wall in Phoenix, Arizona. That
sensor had to be 160 degrees. Melted off the side of the house. There's no way it's gonna catch up to the water run times. It's saying more water, more water, more water. The thing will never catch up.

They gotta be representative of the whole landscape. In Phoenix, it should never be on the southwest facing wall of anything. Get that thing over to a more representative area of the full landscape.

These are the low hanging fruit things that guys go, "Oh man, that guy wants a rain sensor? What a pain in the butt!"

No! That's another $150-$200 you can add to a ticket and install it. They don't know anything
about it. You know everything about it. Take advantage of it. Go out there. Install it for them. They'll think you're a hero.

But let's install them correctly. And our guys can make sure that you're getting it installed correctly if there's any questions.


Click Here for More Drought Solutions
Read More

Topics: Maintenance, Water Conservation, Drought Solutions

What is Evapotranspiration and How Does it Help Us Save Water?

Posted by Bob Franchetto on Jul 25, 2014 12:27:00 PM

It's easy to know when we're under watering a landscape. In Part 4 of our Drought Solutions video series, you'll learn how ET gives us a starting point to know how much we're over watering a landscape.


Video Transcription

It's easy to know when we're under watering a landscape. True? How do we know when we're under watering a landscape?

Perfect, it dies. That's how we know.

The harder part is how we know when we're over watering that landscape? Potentially it dies. If it's been done long enough.

But what is our starting point on over water? We need a starting point and the starting point is ET.

What is ET?

Does everybody know what ET is? No, it's not that little guy that flew around in the 80's.

Yes, it is evapotranspiration. And we can make this really, really simple. Everybody hears ET and they go, "Oh, it's an ET controller. It's this controller. It's that controller. Its got ET."

ET in a simplified form is the rate at which soil gives off moisture in evaporation with the rate at which trees and plant material give off moisture. So you got evaporation and you got transpiration. You put the two together and you got evapotranspiration. ET.

It's the rate at which soil and plant material gives off water to the atmosphere in a day and it's measured in inches. It's just that simple. Don't make it any more than that.

The original ET calculation came from the Center for Irrigation Technology out of Fresno, California in July on tall fescue turf is where that base number came from.

So we have controls now that replenish water based on that daily ET. So you will have healthy plant material if you put back on that plant material exactly the amount of water that's given off to atmosphere every day.

That doesn't mean 15 minutes every single day of the week. The savings comes in when that controller does this and we're gonna talk a little bit about that.

Evapotranspiration on a Bright Sunny Day

evapotranspiration example 1

So let's say today, a bright sunny day outside. Bright sunny day. We've got a valve. It's got plant material on it and for this past 24 hours on this valve that plant used .3 of an inch of water in evaporation.

The sprinkler head on those zones have a precipation rate, that's the amount of water that comes out of that sprinkler head that gets down into the turf, of 1.8 inches per hour.

What is the adjusted ET run time for that station?

You take the 1.8 inches. That's a given. We know that, that's the rate of the heads. You divide it by the .3. That's the water that's coming off of the plant in evaporation.

That equals 6. Well now you gotta divide that 6 into 60 minutes cause that's how many are in an hour. It's measured in inches per hour.

That gives us a 10 minute run time. We know for a fact because of the way the system is installed that we've got 15 gallons a minute coming through that system. Well that 15 gallons/minute x 10 minutes, you got 150 gallons of water used today.

Evapotranspiration on a Calm, Cloudy Day

evapotranspiration example 2

Tomorrow, exactly the same system. Past 24 hours, the evaporation on that same system, instead of being .3 is now .18. That zone hasn't changed so it's gonna put down water at 1.8 inches per hour.

So what you do is you take that 1.8. You divide it by .18. That gives you a value of 10. You divide that 10 into your 60 minutes, and now you've got a 6 minute run time instead of that 10 minute run time.

So yesterday that system used 150 gallons. When you go to smart controls today, it's going to use 90.

This is where our water savings come into play on ET controllers. This is simplified down, but this is the basics of ET.

Click Here for More Drought Solutions
Read More

Topics: Maintenance, Water Conservation, Construction, Drought Solutions

How to Hydrozone an Irrigation System That's Already Installed

Posted by Bob Franchetto on Jul 23, 2014 12:53:00 PM

It can be challenging to hydrozone an irrigation system after it's been installed. In Part 3 of our Drought Solutions video series, you'll learn how to hydrozone by making a simple tweak to the existing system.

Video Transcription

Hydrozoning is easy to do at installation. It's a little tougher to do after. There's some stuff we can do though.

And what hydrozoning is, it is putting like plant material in like soils with like exposures on the same valve.

sample hydrozone plan

So, typical yard. Let's say this is just a back yard. Let's say this side of the yard has the same plant material as this side. Same soil, same plant material, different sun exposure. This side is in full sun. This side is in shade. And we got this drip system going to all of our plants all the way around.

Traditionally what I see is what? You've got this cool controller that has program on top of program. Program 1, Program A - turf. Program B - shrubs. Program C - trees. And the only time it's mixed up is shrubs and trees. It may be trees then shrubs.

We use 3 programs. Why did they give us all those other programs? For fun?

Hydrozoning. We've got other programs in there so that now we could put like things on like programs. There's an opportunity save water and here's why.

This is in the sunshine. This is in the shade. Which one are we gonna water to? We're gonna water to the sunshine.

So let's say we have to up our run time and double our run time to keep this stuff alive in the summer.

What's this look like over here in the shade? It's mush. It's a swamp. It's that wet soil we had on that one photo. It's dead soil. We just created this non-living soil that is over watered by at least 20%, because I know it's closer to 50%.

But you say, "OK, I didn't install it. I didn't install it, what do you want me to do? If that plant dies over there, I gotta replace it."

You're right. The option is, is over here put 2 gallon an hour emitters in. Over here, put 1 gallon. Or 4 and 2, or whatever the site requires. You can hydrozone on the same valve and get close. And every time you get close, you're saving water.


Click Here for More Drought Solutions

Read More

Topics: Maintenance, Water Conservation, Drought Solutions

4 Types of Pressure Regulators that Minimize Water Loss

Posted by Bob Franchetto on Jul 21, 2014 5:37:00 PM

Evaporation can cause an irrigation system to waste a significant amount of water.

In Part 2 of our Drought Solutions video series, Bob Franchetto, DBDS Maintenance & Construction, shows you how to quickly minimize evaporation through pressure regulation.


Video Transcription

Minimize evaporation. How many times do we see this every day? Or better than that, how many times do we see this? We see this every day for sure.

What is your standard operating pressure here in San Diego? What's your static pressure? Ok, so you're 50 or 60? 50 or 60 static pressure?

Yesterday static pressure was 80 sitting at the store and working pressure was about 65. 65 psi on a gear drive rotor is too much. They're 40 to 55, 40 to 60. You know, too much and you get a lot of evaporation.

What's the standard operating pressure for a standard spray nozzle? Little low.

30. 30 psi. So on the same system when we got sprays, at 65 coming in, you're gonna have a ton of the atomization of the water and that's evaporation.

There goes your 20% savings. Let alone this property manager is not real happy with as much moisture as he's got on all of his sidewalks and his building.

rotor evaporating

What to Do When You Have Too Much Pressure

These are opportunities. If we're going to fix this, how would we fix that? This is a gear drive rotor. How would we fix that pressure?

Pressure regulator. So everybody knows we could put a brass pressure regulator on the whole system and knock that pressure down.

So, if we we're gonna change just this one valve that's running right here. How would we change of pressure on just that one valve?

Does everybody know what a PRS dial is? Every manufacturer makes one. This happens to be Rain Bird's. It's a PRS dial.

You take the standard solenoid off your valve. Pull it out. Install this piece. Put your solenoid back on top. So now you've got this assembly that's like that on top of your solenoid. Screw this device in and this is your dial regulator, and I'll send it around.

And now you can dial in whatever pressure you want that system to work at. Not a shovel one came out of the ground.

It's called a PRS dial. A pressure regulating stem, because that's Rain Bird's pressure regulation.

How to Check Pressure

It's got a little Schrader valve on the back side. So you can check to see that that pressure that it actually is reading on that dial is what you're getting.

Better than that, take your pitot tube and go out to this nozzle right here and check what the pressure is. Cause that's where we want the pressure to be. So we may be at 50 psi here at the valve, but now we're at 45 at the nozzle and that's perfect.

And that's what we want. That's how we get the most efficient system. Water going out in proper droplet size and not evaporating. That's how we do it.

This is the little dial device. You can see, mess with the dial, it moves. Real, real simple way, without digging, to change pressure.

Changing Pressure in an Irrigation System

Can you change pressure any other way on a system? How do you make pressure go up on a system? There's only one way. Simple. A pump. You can only make pressure go up with a pump.

There's only one way to make pressure go down. Pressure regulator.

So now I'm gonna get the question of, "Oh no. You can make pressure go down! All you gotta do is cut down on the flow control."

We've got smart guys in here. Cause that always comes up. Every time.

That doesn't change pressure. That changes velocity. How fast the water is going through the valve. That's all that does. Velocity changes will look like pressure reduction, but that's not what it is. Cause your pressure is still the same on the incoming and the outgoing unless you have a PRS dial or some sort of regulator on it.

When you change velocity, that's fine tuning that valve. And is everybody fine tuned every valve out there in the system? Sure we have!

How to Fine Tune a Valve

Does everybody know how to fine tune a valve?

Let's say we're fine tuning this one right here. Simple. No matter what valve it is. If it has a flow control, get in that valve box when the system is running and you crank this flow control down until you see that system start to fail.

As soon as you see it start to fail, back it off about 1 1/2 turns and let it sit.

Your valves will now close at a more even rate. They'll close quicker and there's almost no way for this valve to stick on now.

The majority of the time when a valve sticks on, it's because the diaphragm gets shoved up into the top of that bonnet cavity so far that it creates a small vacuum up there and that assist spring that's in there isn't strong enough to break that vacuum. And the valve sticks on. Controller can be completely turned off, but your valves sticks on.

You fine tune, you tune your valves. Now you're keeping more water on top of the diaphragm. It aids in the closing.

4 Types of Pressure Regulators

Pressure, we just went through all the pressures.
1. Pressures may be reduced with a pressure regulator for the entire system.
2. Pressure may be reduced at the valve using a PRS dial.
3. Pressure may be reduced using a PRS spray body. That's a huge one. We're going to talk more about that.
4. Pressure may be reduced using a pressure regulator built into the control valve.

And minor pressure reductions may be made using the valve's flow control. True or false? False statement. There's a lot of folks that think that's true.

"Oh, I change the pressure. I cranked down on the flow control."

No, you didn't. That pressure is still 45, 55, 65, 75 going through that.

Every valve should be fine tuned. 99% of the valve boxes I go out and jump into, that valve is all the way open and somebody is complaining cause they're having a problem with it.

Turn on the system. Fine tune it down. Start there. Get it to where it works and say ok, let's operate a cycle and let's see what it does.

Traditionally your problems go away and it's usually because you got a stuck on valve and it created vacuum up in the top of that. Traditionally that's the issue.


Click Here for More Drought Solutions

Read More

Topics: Maintenance, Water Conservation, Drought Solutions

How to Detect Water Leaks with the Water Meter

Posted by Bob Franchetto on Jul 16, 2014 10:19:00 AM

The water meter is an overlooked tool that can help you quickly determine if there's a leak in your customer's irrigation system.

In Part 1 of our Drought Solutions video series, Bob Franchetto, DBDS Maintenance & Construction, shows you how the water meter can help you find and correct leaks.


Video Transcript

Who's been in their water meter, residential or commercial, in the last 30 days?

3, 4....good. That's awesome because we get almost next to nothing when I get a raise of hands. I'm glad you're in your water meters because first off you gotta know where it is on the site and what it is.


describe the image


That's a huge, huge indicator of what we've got going on and we don't really care about this dial. If this dial here is moving on you, we've got a big leak.

What you wanna look at is this little flow indicator here. This little dial. Sometimes it's blue, sometimes it's a red triangle.

If that flow indicator is moving and we have the irrigation system shut off, we've got a main line break, we've got a leaky valve, we've got all kinds of other things to go.

This is the number one tool on our irrigation sites that gets overlooked. I ask, "What's the water meter doing?"

Man, I don't even know where the water meter is. Clunk, clunk, clunk you go. You know, cause it's buried. They finally find it, you dig it up and sure enough, there's a water meter there.

How are we checking our totals? Your customer is screaming that we are using too much water. Do a monthly check. See what your total is when you're there at the beginning of the month. Go back one month later. See what your total is then.

Do the math between the two numbers. That's how much water you used. Cubic feet or U.S. gallons is how that number is usually read and it will say on the dial right there. Then check your water bill for that site.

Our government agencies are doing averages like crazy. They will take your peak average and reduce it or increase it depending on where they think our temperatures have been.

Now a lot of them now have data recorders on them to where it will electronically send that data to the machine that the guys have. So he never even opens it up.


Is the Water Meter Leaking?

Check to see if your water meter is leaking. If your water meter is leaking on the city side, you're not going to see it. If your water meter is leaking on your side of the property, huge amounts of water that you're gonna pay for and your water meters are leaking.

I run into that. Dude, that's leaking on the city side. You're not getting billed for it, but we're wasting water. Let's get that fixed. It's a city responsibility.

When it starts leaking on your side, that's your responsibility as a property manager. And that happens a lot, so keep an eye on it.

Simple little tool. It's for the low hanging fruit. This is where we could tell what our leaks are in our system and our irrigation techs don't go look at that. Very, very seldom.


How to Check for Leaks

We went through this a little bit. The water meter is running. We see that little blue dial moving out. With the irrigation system turned off, that means the leak is between our meter and our valves. So now on that mainline piece that's supposed to be solid, no leaks. We got a leak in there.

If the backflow is turned off. That's a question. How many backflow prevention devices do we use? Commercial's got everything? Do we use any backflow in residential? Some?

I know we use a lot of anti-siphon valves. Above ground anti-siphon valve - huge opportunity for low hanging fruit right there.

If the backflow is turned off, now we just isolated - we're not the valves anymore, now we're back to the backflow - and we're still leaking, now we know it's on our main that's going from that meter to that main.

If water is running out of the heads on a flat surface, we've got a weeping valve. That valve is leaking. We know that. Let's go and replace and fix that valve. That's the next step into making sure that that is corrected. This is the stuff that gets missed every day.

And then if we've got a slope surface and we've got water running out the heads at the bottom of the slope, that's low head drainage. If there's no check valves in those sprinkler heads, every single time that system shuts off, every bit of water from the valve all the way down to the head in that pipe is gonna leak out. Every single time.

And we're going to do an ROI calculator to show you how much water you can save by putting a check valve in and capturing that water in the pipe so it doesn't run out every time.

So we're being great water purveyors, we're saying "Yeah, you know what I did? I cycle and soak my slopes because I get the water on the slope and it soaks in and then the system shuts off."

If you don't have a check valve in that head, everything that you're cycle and soaking trying to get in the ground just ran out of your pipe and it looks like this:


describe the image


This is low head drainage right here. Classic. And you know what's so classic about this low head drainage right here and probably this misadjusted sprinkler head right here?

The classic thing about that is your irrigators go driving by that every single day. I know I see it every day. I see it every day on sites. Water on the street, water on the sidewalk, water in the gutters.

And we drive by it and our irrigation tech goes,"Yeah! Irrigation system watered today. Right on! Perfect!"

No, that's not the idea. That's not a visual indicator that the system came on. That's wasted water. That's low hanging fruit.

That's why we need to get in there and look at these kind of things.

It's the stuff we walk by every single day and don't pay attention to is where that 20% savings can come from and it will be way bigger than 20% savings because I've done the math enough times now to know that the numbers will save you water immediately just by corrective actions on this.


Click Here for More Drought Solutions


Read More

Topics: Maintenance, Water Conservation, Construction, Drought Solutions

6 Ways to Start Talking Smart Water with Your Clients

Posted by Ryan Moore on Jul 7, 2014 3:06:00 PM

hose watering lawnAs irrigation and landscape professionals, you know the benefits of using smart water products - reduction in water usage, healthier soil, lower water bills.

But often the hardest part is talking to your clients about why this makes sense for them. While phrases like “distribution uniformity” and “precipitation rates” are common to us, it can be difficult to translate to a homeowner.

Here are some 6 suggestions for talking “smart” to your clients.

Use Visuals They Can Understand

Changing out 10 sprays to PRS heads can save up to 30,000 gallons of water a year. Sounds like a lot. Or is it? That number is pretty intangible.

So use it in a context your client will understand. Instead, try “that’s like filling up your pool twice a year!” That’s something they can relate to.

Show the Savings

Don’t just talk about the savings, show them. There are a number of smart water calculators available from manufacturers and distributors that allow you to enter real-world data like cost of water per gallon, number of heads, etc. The tools are easy to use and can be entered and calculated in about 2 minutes.

Know the Water District Rebates Available in Your Area

Many city and county water districts offer water-saving rebate programs for EPA Watersense labeled products as well as water conservation services. But sometimes these programs can be a little confusing and even intimidating. By becoming familiar with the programs in your area you just increased your value to your client and helped differentiate yourself from your competitors.

A reference for local rebates in 10 states is available at: http://www.horizononline.com/resources-and-training/water-rebates

It’s Not All About Money

Fortunately for most of us, water is still inexpensive. So a typical urban home won’t see the financial impact like a community association or office campus.

But all of us know that many states are facing drought issues and that we all have to do our part to conserve. And most homeowners don’t realize how much of their water is being used outside of the house. Use the graphics provided by organizations like WaterSense to show that up to HALF of their water usage is outside.

Lawns Are Not Evil

Many areas facing drought are going to the extreme of pulling up turf and replacing with hardscaping or artificial turf. And while these are both valid options, temperatures around grassy areas are about 25 degrees cooler than around dead grass or concrete, while removing CO2, dust, and other contaminants from the atmosphere.

It’s important to remind clients of the benefit of healthy landscapes around their house while assuring them that with Smart Water products you can maintain that beauty with less water.

Find the Tools You Need on HorizonOnline.com

Horizon has compiled the industry’s best contractor-to-homeowner selling tools to help you have the Smart Water conversation with your clients. These tools talk everything from smart products to efficient irrigation to help the homeowner understand the benefits and importance of using more innovative products in their irrigation system. Whether left on the door or in a formal sales presentation, these tools will help you be professional and prepared.

Download the files for free at http://www.horizononline.com/resources-training/drought-solutions


Click Here for More Drought Solutions
Read More

Topics: Maintenance, Water Conservation, Construction, Water Rebate Programs