How to Find a Water Leak with the Help of the Water Meter

Posted by Bob Franchetto on May 18, 2017 8:53:09 AM

When was the last time you checked your customer’s water meter? If it’s within the last 30 days, that’s great. But if you’re not in the habit of regularly checking your water meters, there’s a good chance you’re missing a leak.

The water meter is an overlooked tool that helps you quickly detect if there’s a water leak somewhere in your customer's irrigation system. Horizon’s Bob Franchetto has put together a few tips and a video to show you how to find and correct leaks with the water meter.


Is There a Leak?

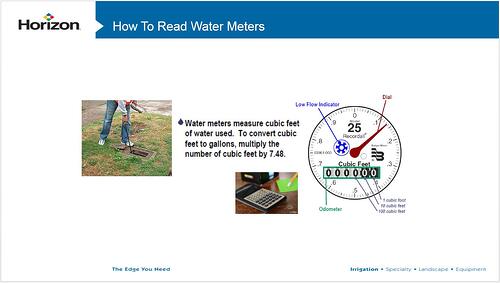
When you’re using the water meter to check for leaks, we’re not concerned about the large dial. When the large dial is moving, we’ve got a big leak. What you want to find is the low flow indicator. Sometimes it’s blue, sometimes it’s a little red triangle.

If the low flow indicator is moving when the irrigation system is shut off, there’s a leak somewhere in the system.


describe the image


Finding the Leak

Step 1: Check if water is leaking.

Where the water is leaking is important. If the water is leaking on the city side, your customer won’t be billed for that water, but it still needs to get fixed. Leaks on the city side are the city’s responsibility and the city should be contacted to arrange service.

When the water is leaking on your customer’s side of the property, your customer is paying for it and it’s your responsibility to fix.

Step 2: Check the system from the meter to the valves.

If the water meter is running with the irrigation system turned off, then there is a leak between the meter and the valves. If the meter is running with the backflow turned off, you have just bypassed the valve and isolated the problem to the main. Your leak is between the meter and the backflow.

Step 3: Check if water is leaking out of the sprinkler heads.

When you have water leaking out of the sprinkler heads on a flat surface, you have a weaping valve. The valve is leaking. Let’s get it fixed or replaced.

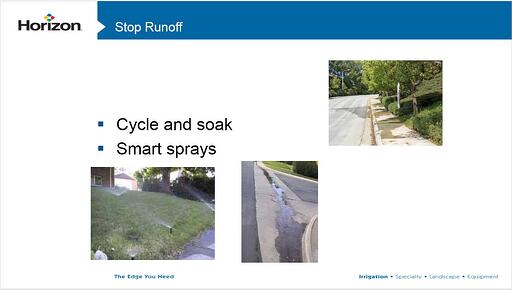
And if the sprinkler heads are leaking on a sloped surface, you may need to install check valves. Without check valves, each time the system shuts off, every bit of water from the valve to the head is going to leak out. It’s a classic example of low head drainage.

The problem further multiplies when you cycle and soak the slope. If you don't have a check valve in the head when you cycle and soak, every cycle will produce additional low head drainage.

As purveyors of water, it’s our job to help our customers better manage their water usage. In many cases, we can dramatically improve an irrigation system’s efficiency with a few simple tweaks. It's the stuff we walk by every single day and don't pay attention to, but it’s easily fixed and it can save a significant amount of water.


Click Here for More Drought Solutions


Read More

Topics: Maintenance, Water Conservation, Construction, Drought Solutions

LED LAMPS – You get what you pay for!

Posted by Mary Martinez on Apr 21, 2017 8:00:00 AM

Yep. There are a lot of LED lamps available online today. And while those lamps are often available at a significant discount, there can be a substantial difference in quality. Horizon only sells products from quality lighting manufacturer partners (Vista, Unique, FX, Kichler & Brilliance) that make professional-grade, reliable products. There is a difference! See for yourself…

landscape_lighting_backyard.jpg

  1. Distributor Support – no matter where you buy, product quality and warranty issues can arise. When there is an issue with products bought online, there is often only an email address provided for you to use when seeking support. Great. But wouldn’t you prefer a living, breathing human being that is available to assist with everything, from troubleshooting to returns?
  2. Warranty & Longevity – Quality lighting manufacturers stand behind their warranty. So, the expectations behind a 5 year warranty and 35,000 hour life are real and supported. Cheap LED’s will commonly state they last for 20 years, but on the back of the box it will say “when run 3 hours a day”. Some even say not to run more than 5 hours at a time or they’ll burn out prematurely.  
  3. LED Binning – LED’s are grown more than created. As a result, their color temperatures (2700 Kelvin, 3000 Kelvin, etc.) are all over the board, so they must be sorted. This process is called binning, and it’s expensive. Quality manufacturers bin their LED’s, and as a result give consistent color temperatures. So 2700K is 2700K. Cheap online LED’s save money by skipping the binning process, and the result is an unprofessional, inconsistent color temperature, where 2700K can be +/- 500K. 
  4. Inconsistent Light Output (Lumens) – Quality manufacturers utilize photo-spectrometers to measure the output of their lamps. This is another quality control step that cheap LED manufacturers skip, which leads to inconsistent output across the lighting system, causing Mrs. Smith to ask why one light hits the top of her trees and the other doesn’t.
  5. Thermal Management (Heat Sink) – In order to generate a lot of light at a very low power consumption rate, LED’s “burn” very hot. This generated heat has to be managed, or dissipated, properly. Horizon’s professional quality LED lamps have this heat sink built in. Most cheap LED manufacturers provide sub-standard heat sinks, which can lead to premature failure and even fire.  
  6. Indoor/Outdoor/Enclosed Fixture Rated – The LED lamps sold at Horizon are designed and manufactured to be used outdoors in an enclosed fixture. Most of the lamps available online come in packaging that clearly states they are not intended to be used outdoors, or in an enclosed fixture. Using these lamps can lead to premature failure, and other issues.
  7. UL, CUL or ETL Listing – all of the LED’s lamps that Horizon sells are rated by one of these entities, which all uphold the same level of standards. Many online LED lamps are not rated/listed, and therefore are manufactured without having to adhere to any standards. This really should speak for itself; the standards are there for a reason.
  8. FCC Listing – All Horizon-sold LED lamps are FCC listed. Most online LED lamps don’t carry FCC clearance. Electronic products that aren’t FCC compliant can cause many kinds of issues, from opening a neighbor’s garage door or messing with Aunt Harriet’s pacemaker.
  9. Rated 8-15 or 8-25 volts – Horizon’s LED lamps are rated to operate consistently across a wide voltage range and maintain a constant light output across the range. Most cheap LED’s are not manufactured to meet these ranges, resulting in small voltage spikes that can cause early lamp failure and varying light output.


In our business relationships are important. You can rely on your relationship with Horizon to support you and your business every step of the way. Why risk your relationship with your client by installing inferior products to save a few bucks? Want to know more? Stop by your local Horizon store today.

Read More

Topics: Lighting, Construction, Outdoor Living

How to Convert a Spray Valve to Subsurface Drip Irrigation

Posted by Bob Franchetto on Aug 15, 2014 2:25:00 PM

Drip irrigation can be a great way to minimize evaporation and deliver the perfect amount of water to plantings, but installing it in some soils can be challenging.

After watching Part 11 of our Drought Solutions video series, you'll know how to quickly convert a spray valve to a drip valve and how to avoid common problems contractors experience when moving to subsurface irrigation.


Video Transcript

Here's a cool little product for converting that little weird area. You know that little weird area. It's hard to spray. It's just like, why are we growing turf there?

Cool product that Agrifim has. Rain bird has one. Hunter has one. Toro has one. This one I like the best so far.

agrifim drip irrigation conversion

You take out your spray body. The whole thing. You screw in their body right here. This is a screen and a pressure regulator all installed in one. Screw that on. Hook up your drip tubing.

You just converted that spray valve to a drip valve without digging up anything. Without digging up the valve to put a pressure regulator and a filter on it. It's all right there. 

And then what you do with the extra heads that are on the system, you just go and put a plug in for the male or female and you plug off all the other heads.

So you just took that little weird system that's not doing anything and you converted that one system that was a problem over to drip.

Low Volume and Subsurface Irrigation

low volume and subsurface irrigation

Points source emitters. I know you guys use quite a bit of this.

How much subsurface do you use? A lot? Where do you use it? Turf or flower beds? Beds. Yeah, we struggle with this under turf. We struggle with this under everything because our soil is so crappy. Our soil just leaches water like crazy. It's so porous. In clay soils you can have some issues too where the water doesn't move enough and it just makes this glob.

So what I end up having to use especially in my flower beds that we're doing subsurface in, I gotta use this Eco-Mat.

You basically put the Eco-Mat down in the bed. You put the grid pattern on top of it. And then now that mat holds the moisture and it's a capillary mat like we used to use in the nursery benches. Pretty cool stuff.

If it's in turf, deeper than your aerator. If it's in your flower beds, I go just below a 1 gallon root ball. Depends on what you're planting in that flower bed all the time.

Your guys gotta know, your crews gotta know that it's down there cause you'll stick a shovel through it. Doesn't matter if you stick a shovel through the mat as much as it does the subsurface.

Subsurface, originally when it came out a lot of guys jumped on it in Phoenix for obvious reasons. No evaporation. That's what they painted it as. No evaporation, no evaporation. Yeah, it's a great deal.

Man, our soils are so rough that we get great looking checkerboard pattern turf. You get this green stripe, green stripe, green stripe, green stripe and all of these little brown spots in between. Because it's really hard to get that tear dropped shape out of that emitter that's coming out of that emitter of water.

The water just naturally wants to get that tear drop to go up and these are relying on soils that can wick a little bit of water back up and you gotta add a ton of organic matter and we're going to talk about that this afternoon. None of this is any good if your soils aren't working for you.


Click Here for More Drought Solutions


Read More

Topics: Water Conservation, Construction, Drought Solutions

3 Spray Nozzles that Quickly Fix Inefficient Irrigation Systems

Posted by Bob Franchetto on Aug 13, 2014 2:24:00 PM

Irrigation systems that are inefficient or stretched can waste a significant amount of water.

In Part 10 of our Drought Solutions video series, you'll discover why the right spray nozzle can greatly increase the efficiency of your customer's irrigation system, the key to using both sprays and rotors on the same system, and a simple way to balance pressure when there's no pressure or volume at the furthest heads.


Video Transcript

We were talking about DU. DU on a sprinkler head. If you get anywhere near 75% - that's distribution uniformity. That's how that one sprinkler head works. You get somewhere near 75%, that's a great, great head.

You take a great sprinkler head at 75% and you put it in a great designed irrigation system. We already know that we can get to 90% water efficiencies. 93%. 95%. That's what we're looking for on every single system.

smarter spray head nozzles slide

Here's the MP Rotator. Here's the Toro Precision Nozzles. You got the Rain Bird Rotary Nozzles. These are all super efficient sprinkler heads because they are evenly matched precip rates. These are already done for us. It's not like your gear drive rotor.

They're all available in radiuses from about 5' to 27'. You're going to use less water. Like up to a third.

Matching Precipitation Rates of Sprays and Rotors

This has a precip rate of .5" an hour. Same exact precip rate as a gear drive rotor. So now you can mix this spray head with a gear drive rotor on the same system because their precip rates are the same.

Cool opportunity. So now instead of having a gear drive rotor shoot all the way across 3 areas and back, you can put this on and get that smaller area taken care of on the same system.

So you got a precip rate of .5" an hour. what's the standard precip rate rate of a spray nozzle? Fixed arc spray. 1.5" an hour. This is 3 times more efficient. So on stretched or zones that have pressure problems, this is a great retrofit because they use that much less water.

A Simple Way to Regulate Pressure Throughout Your System

How many spray heads do you see on systems? I see systems pop up and there's 40 spray heads on it, especially in medians. You start counting them and you go, man that's gotta have a 4" main sitting underneath it. To get the water all the way down there.

Super, super inefficient systems. A lot of times they're so inefficient, by the time you get to the other end, there's no water.

So let's say there's no water at the other end. Because we've got great pressure here, but by the time we get all the way down there, we don't have any pressure or volume. Because they didn't pipe size. That's a whole other class, but anyhow.

They don't have any pressure at the other end, so what can we do?

On a spray system, if we just go and put PRS stems in. Pressure regulating stems. Now the pressure here, instead of being 80 and it being 10 down at the other end.

Now we just retrofitted that system and it balanced that whole system and made it right.

Now it's 30, 30, 30, 30, 30, and you stretch that pressure down to the other end. Let's go ahead and put something on now that instead of using 1.5" of water an hour, only uses .5" of water.

Now we just retrofitted that system and it balanced that whole system and made it right. This is great for retrofit systems that are stretched. These are great products for that.

When they originally came out, they came out for new installs. New install, new install, new install.

It's like, wait a minute. These are retrofit issues right here. All solved  with one. And not one of these, do you have to pull out a shovel to fix. It's an internal gut change.

If we're going to do the pressure regulator and we're going to do the nozzle, we might as well put the check valve in the bottom. And it's an easy, you just go along and you gut cans. And you just retrofitted a whole system. And the water savings you'll see this afternoon. Huge. Huge water savings.

Click Here for More Drought Solutions
Read More

Topics: Maintenance, Water Conservation, Construction, Drought Solutions

6 Ways an ET Controller Lowers the Cost of Irrigation Systems

Posted by Bob Franchetto on Aug 7, 2014 3:57:00 PM

Irrigation systems that account for changes in Evapotranspiration (ET) can save your customers money in ways you may not have considered.

In Part 9 of our Drought Solutions video series, we'll cover 6 ways an ET controller can lower the cost of irrigating and maintaining a property.


Video Transcript

Benefit #1: Reduced Water Cost

Some of the benefits of ET. We know for a fact that we can save that 20% in water cost just by going to ET.

We're not watering on that straight line. 15 minute, 15 minute, 15 minute, 15 minute. 10 minute, 10 minute, 10 minute. Whatever it is. We're watering on that daily need. Whatever that daily need is.

Benefit #2: Healthier Landscape & Greater Root Structure

You're going to get a healthier landscape because we're watering what we need. You're going to get greater root structure and the reason you're going to get root structure is because deep infrequent watering is better.

If you've got tree roots that are coming up into your turf plots, we've got a watering practice issue. That means we're watering every single day, small cycles and we're not getting good penetration into the soil.

If you get penetration into the soil, and we'll talk about this this afternoon, then your roots will go deeper. Deeper roots, searching for water, healthier roots. Healthier plant, more drought tolerant.

Benefit #3: Reduced Fertilizer Wash Through & Benefit #4: Reduced Storm and Hardscape Damage

You get a reduced fertilizer wash through. Reduced storm and hardscape damage. We don't have sidewalks pushing up because those roots are searching for water way up top. They're going down. You don't have trees falling over because the root structure is down there and got a good anchor.

ET and Proper Scheduling

Benefit #5: Reduced Electrical Cost (if pump equipped)

The number one cost to a landscape is electric usage if there's a pump installed. Do we have any pumps out there? Any pump stations?

If you've got a pump station installed, not only do you have increased pressure - so we got a lot of opportunities to knock down that pressure. Get that pump station set properly.

Pumps a lot of times are, "Oh man, I'm not going to mess with that."

Because your pump guy says, "No, don't mess with that."

No, your pump needs to be putting out what your system needs and that system need, you need to go out to your furthest system with the most heads and we need to do a test to see what is out there and then we need to adjust the pump to fit that parameter.

So if we've got 70 psi at the furthest station and we know we only need 45, we gotta go detune that pump. Your pump guy is gonna tell you, "No, you're not touching my pump. Put a pressure regulator on it."

Pumps should be tuned to match the needs of the irrigation system. Test the pressure at the furthest station and adjust the pump as needed.

No, no, no, no, no. Let's tune your pump. That's a whole other side of the business that gets a little sticky, but pumps have parameters. Let's go set the pump to meet the parameters of your system. It's almost never done.

And they'll start talking their pump curve. If you get too far to the left or to the right of my pump curve, it's gonna be inefficient. OK, so waste all my water and still run that pump at full throttle. Because they like to run their pumps at full tilt.

But that's why we have variable speed motors on our pumps. Variable frequency drives. That's what it's all for. Pump guys won't let you do that, but we can help you get through that.

But that's your number one cost if there's a pump.

Benefit #6: Reduced Pump Maintenance Costs

And then maintenance will be your number two cost. Because pump maintenance isn't cheap. If you gotta pull the pumps out of the hole if it's on a wet well system. Or if you gotta pull pumps, even if it's just on a city system. That's where your costs come in.


Click Here for More Drought Solutions


Read More

Topics: Maintenance, Water Conservation, Construction, Drought Solutions

Sprinkler Spacing 101: How to Avoid Dry Spots and Boost Uniformity

Posted by Bob Franchetto on Aug 5, 2014 3:28:00 PM

When dry spots appear around sprinkler heads in summer, there is often a spacing problem that needs to be corrected.

In Part 8 of our Drought Solutions video series, you’ll discover why you shouldn’t completely trust the manufacturer’s specifications and learn a few approaches that can help you properly space heads.


Video Transcript

If you look at this head, there is a very slight doughnut right here on this densogram. Once again, remember it's in a labratory.

The CU on this system shows up at a 93%. In theory, that would be a phenomenal system. Your DU right here is at 89%. Pretty good CU, pretty good DU in the laboratory situation. But there is a very slight area here of a doughnut.

sprinkler densogram

What that's telling us is that in the wintertime, this system works just fine. As soon as our ET goes up, we're going to start seeing those doughnuts of cure on that site. There is a spacing problem that we need to get out there and correct. And once we correct that spacing problem, those doughnuts go away.

That's called a stretched system. They're out there everywhere and you it said earlier. Why there's a stretched system out there is because our construction crew knows you know what, if I value engineer this and I take out three valves, I'll win that job. I can add one more head here, and one more head there, and one more head here because I know that.

Well yeah, it's overlapped. It's stretched. That doesn't mean it's right.

3 Layout & Uniformity Myths

Myth #1: Coverage doesn't always mean uniformity.

In fact, it usually doesn't. Uniformity has to do with what's in that book. But you gotta remember uniformity in that book is in a laboratory.

Myth #2: Triangle patterns are better than square patterns.

So triangle patterns are not always better than square patterns. The old rule of thumb was I set that up on a triangle spacing. Triangle spacing has way better CU than square spacing.

Not always true. It has to do with the site. It has to do with the turf plot we're watering. It has to do with all those factors that we gotta bring into it.

Myth #3: Head to head coverage is ideal.

A good rule of thumb that I've always used: If you got a system set up on 15' spacing based on catalog numbers, 15' nozzles, space the head about 12'.

Give yourself a little overlap because not one of those spacings that they have listed on those nozzles is out there in the field. Every one of them is in that laboratory under ideal conditions. You've got to set up a little different than what's in there.

The Irrigation Auditors Society through IA, they say give yourself a foot overlap. That's still a little close.

If you're not having to go to the controller and up your run times dramatically and you've got a little bit of an extra overlap on head to head, your systems are going to be more efficient because now we're not stretching them and we got the opportunity to to keep those systems tight. Keep everything rolling together because out there in the environment it's totally different than a laboratory. And you guys know that because you've been out there.


Click Here for More Drought Solutions
Read More

Topics: Maintenance, Water Conservation, Construction, Drought Solutions

The Quickest Way to Improve Distribution Uniformity

Posted by Bob Franchetto on Jul 31, 2014 11:58:00 PM

Are dry spots showing up in your customer's turf? The irrigation system may have a problem with its uniformity.

In Part 7 of our Drought Solutions video series, you'll learn about distribution uniformity (DU) and the coefficient of uniformity (CU) and how to increase the system's uniformity by matching precipitation rates.


Video Transcript

No matter how smart our system is, if our sprinkler heads aren't installed properly, it doesn't matter.

Coefficient of uniformity (CU) is a statistical method of evaluating a system's uniformity. That's how the system is working as a whole.

The CU is all measured on a densogram and it's in a laboratory situation. Every manufacturer's catalog has their laboratory numbers in there. These manufacturers spend millions of dollars on these laboratories where they do the testing of these heads.

They want their numbers to be better than their competitor's numbers. They're spending tons of money. The one thing they're shy on is running this whole thing in a vacuum.

They're in buildings. Absolutely zero humidity. Absolutely zero airflow. They've got these things pinned down to where this is what my sprinkler head does.

So when you're designing or you're reading the charts, just remember that all of those charts are done in a laboratory. These numbers are done in a laboratory. They can tell us some information, but let's make sure that we're not relying on that 1000%. And we'll talk about that a little bit more on spacing.


coefficient of uniformity slide

Dry Spots & Stretched Systems

So your distribution uniformity (DU), that's the spacing. This system is a gear drive rotor system. It's set up on triangle spacing and true to fashion, you've got some dry spots here. You got spots here, dry spots here, you got a big old dry spot here.  

Traditionally we call this a stretched system. Why is it stretched? It's because this sprinkler head is not watering that one over there and that sprinkler head's not watering this one over here. They have to water each other.

Spray system, gear drive rotor system. To get the water to go that far, it has to water itself. I mean it can't water itself. It has to rely on its neighbor to water it. if you don't have at least head to head coverage in those situations, you're gonna get dry spots.

And these dry spots may not show up right now. Man, my system works great 99% of the winter. Summertime come along, my customers aren't very happy. We got doughnuts. Big doughnuts around gear drive rotors. Big doughnuts around spray heads.

The Wrong Way to Fix a Dry Spot

What's the common way to cure a doughnut? How do you fix a doughnut? Out in the field, what's the number one fix? The first thing guys do?

Up the run time. Oop we need more water. Well there goes your 20% savings cause now you're micro flood irrigating instead of having your system set up properly. Let alone the 50%, 60%, 70% more water that you're gonna use by doing stuff like that.

So what these things show us in a laboratory is how the system works in a stretch situation. If you look now, we get over here, the system is getting a little better.

Improving Uniformity with Matched Precipitation Rates

It may be because they're nozzling properly. Ok, beautiful, matched precipitation rate. Pretty cool word. It's even better with gear drive rotors because they give you a whole rack. 1 head, 12 nozzles. That's cool! 12 nozzles. I wonder why I need 12 of them for 1 head?

What happens? Every single head out there has got a #7 nozzle in it. So this little corner and this little corner has got a #7. And this little corner's got a #7.

So if we've got a #7 nozzle here, that's a quarter spray. A #7 nozzle there, that's a half spray. And a #7 there, that's a full spray. What's the problem with that?

That full spray is gonna be a dry spot. That's gonna be a doughnut. You're watering 4 times as much area as this quarter. That's why they give you a rack of 10 nozzles. That's why they give you that book that says, OK if that full circle, if we put up for 4 gallon/minute nozzle in there, that half has to be a 2 gallon/minute nozzle and this quarter has got to be a 1 gallon/ minute nozzle.

They all say they're matched precip rate, but you gotta change the nozzles. They can't all be a #7 nozzle. Let alone a #10 nozzle. A #10 nozzle puts out about 10 gallons/minute.

I can walk onto your sites today and I will start pulling up rotors and they all have the same nozzle in them. I see architects design them with all the same nozzle. Any architects? Design them with all the same nozzle in it. It's like guys, what did you do that for?

With all the same nozzle in them, you're going to get some crazy looking stuff. When you start getting closer to match precip, you're going to get it right.

Match precip rate. Now, on our match precip rate sprays heads, you don't have to do that. They automatically do it. The manufacturer says it's a fixed arc. Here's what it's gonna do. At this arc, here's our precip.  

So MPR - Matched Precip Rates - when they did it in spray heads, it's fine. But in gear drive rotors, it's up to you. It's up to us as water managers.

That's the low hanging fruit that we can grab onto and say, you know I know what's wrong with your system. I mean this quarter over here, I'm up to my ankle in mud and we got a doughnut around that full circle on exactly the same valve. That's the opportunity.


Click Here for More Drought Solutions
Read More

Topics: Maintenance, Water Conservation, Construction, Drought Solutions

6 Questions to Ask Before You Buy a Smart Irrigation Controller

Posted by Bob Franchetto on Jul 29, 2014 1:32:00 PM

Many manufacturers make smart controllers for irrigation systems, but how do you know which one is right for you?

After watching Part 5 of our Drought Solutions video series, you'll be able to identify what types of smart controllers are the right fit for the properties you manage.


Video Transcript

How many folks are using smart controls on all their properties? How many are using smart controls on one property?

Perfect. Start doing some calculations on those properties so that you can tell the next guy why they're important.

They're important because the majority of the irrigation timers out there today are set at 10 minutes, every day, forever. And the reason that is, is because that's the default program. The battery went dead. The power went out. It came back on. It says default program. That's all I know and that's what it's gonna do.

Smart Controllers Slide

My 1st Smart Control System

I put in - 16 years ago in Phoenix, Arizona - a smart control system. They were all beta testing at the time. I've got a mini weather station on my house and I've got a beta test smart control.

16 years ago, I put it in. Got it all dialed. You gotta tweak 'em a little bit. Got it to tweaked so that wet zones were fixed and dry zones were fixed. And a little tweaking...and I let it sit in Phoenix in June.

My turf plot didn't water for 11 days (I thought I was as a pretty decent water manager):
 - Day 2, Day 3 - Oh crap, it's gonna go.
 - Day 5 - Uh oh, this thing ain't working.
 - Day 7 - Nothing's dead. Leave it alone! Nothing's dead.
 - Day 11 - My irrigation system came on.

And it watered and it automatically went into its cycle and soak feature because you put parameters in your smart controllers.

Question #1: What parameters does the controller take into account?

What sun exposure, what slope, what soil type, what plant material, what sprinkler head. There's a ton of data that goes into them. But once you set it, it takes all the guesswork out. Because it's just doing this.

I never touch my controller. It's been 15 years since I touched my controller. I go out and look at it every once in a while. Uh yeah, it's still working. Nothing's dead.

Now you do have to do some the system maintenance things. I've replaced solenoids. Woah, that's looking stressed. Why is that looking stressed? Whoops, solenoid blowed up! You know, so you got a bad solenoid. You gotta do all that kind of stuff still.

Question #2: How often does the controller adjust?

But as far as the controls, they're not set it and forget it. Once you get them tweaked. Once you get them where you want them to be, they'll do the work for you and they'll daily adjust. They'll hourly adjust.

Mine adjust hourly. Most of them adjust daily. At midnight, they send their signal.

Question #3: Where does the controller get its data?

There is a ton of ET based controllers out there. Every manufacturer makes one. Depending on your comfort level with them, they can go anywhere from your basic little sensor device - and we'll talk a little bit about that - all the way up to a full blown satellite to where we're getting daily communication off of a satellite. Daily ET downloads off a cell phone. Somehow it's communicating like that.

Question #4: Are there recurring charges for the data?

Now some of those have recurring charges. Just remember that. Yeah, it's an ET based controller, but it's communicating with something. It needs that daily recurring, monthly recurring charge. So that you can keep up on the data.

Question #5: Does the controller use historical data?

Some of them use historical data. Your zip code has a block of historical data that goes with it. So if you do lose daily communication with a satellite. If you do have their system go down for a period of time. If you do have a weather station that goes offline, the controller still has some historical data that it's running on to keep your site alive. 

That's critical for obvious reasons. Oops. Sorry, the satellite went down. Your irrigation's dead. Your system's dead. Your plant material is dead. Everything's gone.

That's not acceptable. That's why they have these historical backups. No, they won't go into a 10 minute everyday. They won't do that. They'll use historical data. So they'll use an average ET for that month for your zip code is how they work.

Question #6: Will the manufacturer support you?

If you need more information on it, give one of us a call. Talk to the guys on the counter. They have their locals that are best for this territory.

Your best bet on using a product is who is the local representative from the manufacturer and how willing are they to support you?

That's how we make our decisions.

Hey, so and so takes care of me like that. He'll jump on a job site. He'll help us out. That's who I go with.

Just like we'll jump on a job site. You know, we've got Neb here in the territory that many of you know. We've got several sales reps here in the territory that you can have come out to your sites to help us get further along getting smart controls on your site.


Click Here for More Drought Solutions


Read More

Topics: Training, Water Conservation, Construction, Drought Solutions

What is Evapotranspiration and How Does it Help Us Save Water?

Posted by Bob Franchetto on Jul 25, 2014 12:27:00 PM

It's easy to know when we're under watering a landscape. In Part 4 of our Drought Solutions video series, you'll learn how ET gives us a starting point to know how much we're over watering a landscape.


Video Transcription

It's easy to know when we're under watering a landscape. True? How do we know when we're under watering a landscape?

Perfect, it dies. That's how we know.

The harder part is how we know when we're over watering that landscape? Potentially it dies. If it's been done long enough.

But what is our starting point on over water? We need a starting point and the starting point is ET.

What is ET?

Does everybody know what ET is? No, it's not that little guy that flew around in the 80's.

Yes, it is evapotranspiration. And we can make this really, really simple. Everybody hears ET and they go, "Oh, it's an ET controller. It's this controller. It's that controller. Its got ET."

ET in a simplified form is the rate at which soil gives off moisture in evaporation with the rate at which trees and plant material give off moisture. So you got evaporation and you got transpiration. You put the two together and you got evapotranspiration. ET.

It's the rate at which soil and plant material gives off water to the atmosphere in a day and it's measured in inches. It's just that simple. Don't make it any more than that.

The original ET calculation came from the Center for Irrigation Technology out of Fresno, California in July on tall fescue turf is where that base number came from.

So we have controls now that replenish water based on that daily ET. So you will have healthy plant material if you put back on that plant material exactly the amount of water that's given off to atmosphere every day.

That doesn't mean 15 minutes every single day of the week. The savings comes in when that controller does this and we're gonna talk a little bit about that.

Evapotranspiration on a Bright Sunny Day

evapotranspiration example 1

So let's say today, a bright sunny day outside. Bright sunny day. We've got a valve. It's got plant material on it and for this past 24 hours on this valve that plant used .3 of an inch of water in evaporation.

The sprinkler head on those zones have a precipation rate, that's the amount of water that comes out of that sprinkler head that gets down into the turf, of 1.8 inches per hour.

What is the adjusted ET run time for that station?

You take the 1.8 inches. That's a given. We know that, that's the rate of the heads. You divide it by the .3. That's the water that's coming off of the plant in evaporation.

That equals 6. Well now you gotta divide that 6 into 60 minutes cause that's how many are in an hour. It's measured in inches per hour.

That gives us a 10 minute run time. We know for a fact because of the way the system is installed that we've got 15 gallons a minute coming through that system. Well that 15 gallons/minute x 10 minutes, you got 150 gallons of water used today.

Evapotranspiration on a Calm, Cloudy Day

evapotranspiration example 2

Tomorrow, exactly the same system. Past 24 hours, the evaporation on that same system, instead of being .3 is now .18. That zone hasn't changed so it's gonna put down water at 1.8 inches per hour.

So what you do is you take that 1.8. You divide it by .18. That gives you a value of 10. You divide that 10 into your 60 minutes, and now you've got a 6 minute run time instead of that 10 minute run time.

So yesterday that system used 150 gallons. When you go to smart controls today, it's going to use 90.

This is where our water savings come into play on ET controllers. This is simplified down, but this is the basics of ET.

Click Here for More Drought Solutions
Read More

Topics: Maintenance, Water Conservation, Construction, Drought Solutions

How to Detect Water Leaks with the Water Meter

Posted by Bob Franchetto on Jul 16, 2014 10:19:00 AM

The water meter is an overlooked tool that can help you quickly determine if there's a leak in your customer's irrigation system.

In Part 1 of our Drought Solutions video series, Bob Franchetto, DBDS Maintenance & Construction, shows you how the water meter can help you find and correct leaks.


Video Transcript

Who's been in their water meter, residential or commercial, in the last 30 days?

3, 4....good. That's awesome because we get almost next to nothing when I get a raise of hands. I'm glad you're in your water meters because first off you gotta know where it is on the site and what it is.


describe the image


That's a huge, huge indicator of what we've got going on and we don't really care about this dial. If this dial here is moving on you, we've got a big leak.

What you wanna look at is this little flow indicator here. This little dial. Sometimes it's blue, sometimes it's a red triangle.

If that flow indicator is moving and we have the irrigation system shut off, we've got a main line break, we've got a leaky valve, we've got all kinds of other things to go.

This is the number one tool on our irrigation sites that gets overlooked. I ask, "What's the water meter doing?"

Man, I don't even know where the water meter is. Clunk, clunk, clunk you go. You know, cause it's buried. They finally find it, you dig it up and sure enough, there's a water meter there.

How are we checking our totals? Your customer is screaming that we are using too much water. Do a monthly check. See what your total is when you're there at the beginning of the month. Go back one month later. See what your total is then.

Do the math between the two numbers. That's how much water you used. Cubic feet or U.S. gallons is how that number is usually read and it will say on the dial right there. Then check your water bill for that site.

Our government agencies are doing averages like crazy. They will take your peak average and reduce it or increase it depending on where they think our temperatures have been.

Now a lot of them now have data recorders on them to where it will electronically send that data to the machine that the guys have. So he never even opens it up.


Is the Water Meter Leaking?

Check to see if your water meter is leaking. If your water meter is leaking on the city side, you're not going to see it. If your water meter is leaking on your side of the property, huge amounts of water that you're gonna pay for and your water meters are leaking.

I run into that. Dude, that's leaking on the city side. You're not getting billed for it, but we're wasting water. Let's get that fixed. It's a city responsibility.

When it starts leaking on your side, that's your responsibility as a property manager. And that happens a lot, so keep an eye on it.

Simple little tool. It's for the low hanging fruit. This is where we could tell what our leaks are in our system and our irrigation techs don't go look at that. Very, very seldom.


How to Check for Leaks

We went through this a little bit. The water meter is running. We see that little blue dial moving out. With the irrigation system turned off, that means the leak is between our meter and our valves. So now on that mainline piece that's supposed to be solid, no leaks. We got a leak in there.

If the backflow is turned off. That's a question. How many backflow prevention devices do we use? Commercial's got everything? Do we use any backflow in residential? Some?

I know we use a lot of anti-siphon valves. Above ground anti-siphon valve - huge opportunity for low hanging fruit right there.

If the backflow is turned off, now we just isolated - we're not the valves anymore, now we're back to the backflow - and we're still leaking, now we know it's on our main that's going from that meter to that main.

If water is running out of the heads on a flat surface, we've got a weeping valve. That valve is leaking. We know that. Let's go and replace and fix that valve. That's the next step into making sure that that is corrected. This is the stuff that gets missed every day.

And then if we've got a slope surface and we've got water running out the heads at the bottom of the slope, that's low head drainage. If there's no check valves in those sprinkler heads, every single time that system shuts off, every bit of water from the valve all the way down to the head in that pipe is gonna leak out. Every single time.

And we're going to do an ROI calculator to show you how much water you can save by putting a check valve in and capturing that water in the pipe so it doesn't run out every time.

So we're being great water purveyors, we're saying "Yeah, you know what I did? I cycle and soak my slopes because I get the water on the slope and it soaks in and then the system shuts off."

If you don't have a check valve in that head, everything that you're cycle and soaking trying to get in the ground just ran out of your pipe and it looks like this:


describe the image


This is low head drainage right here. Classic. And you know what's so classic about this low head drainage right here and probably this misadjusted sprinkler head right here?

The classic thing about that is your irrigators go driving by that every single day. I know I see it every day. I see it every day on sites. Water on the street, water on the sidewalk, water in the gutters.

And we drive by it and our irrigation tech goes,"Yeah! Irrigation system watered today. Right on! Perfect!"

No, that's not the idea. That's not a visual indicator that the system came on. That's wasted water. That's low hanging fruit.

That's why we need to get in there and look at these kind of things.

It's the stuff we walk by every single day and don't pay attention to is where that 20% savings can come from and it will be way bigger than 20% savings because I've done the math enough times now to know that the numbers will save you water immediately just by corrective actions on this.


Click Here for More Drought Solutions


Read More

Topics: Maintenance, Water Conservation, Construction, Drought Solutions