LED LAMPS – You get what you pay for!

Posted by Mary Martinez on Apr 21, 2017 8:00:00 AM

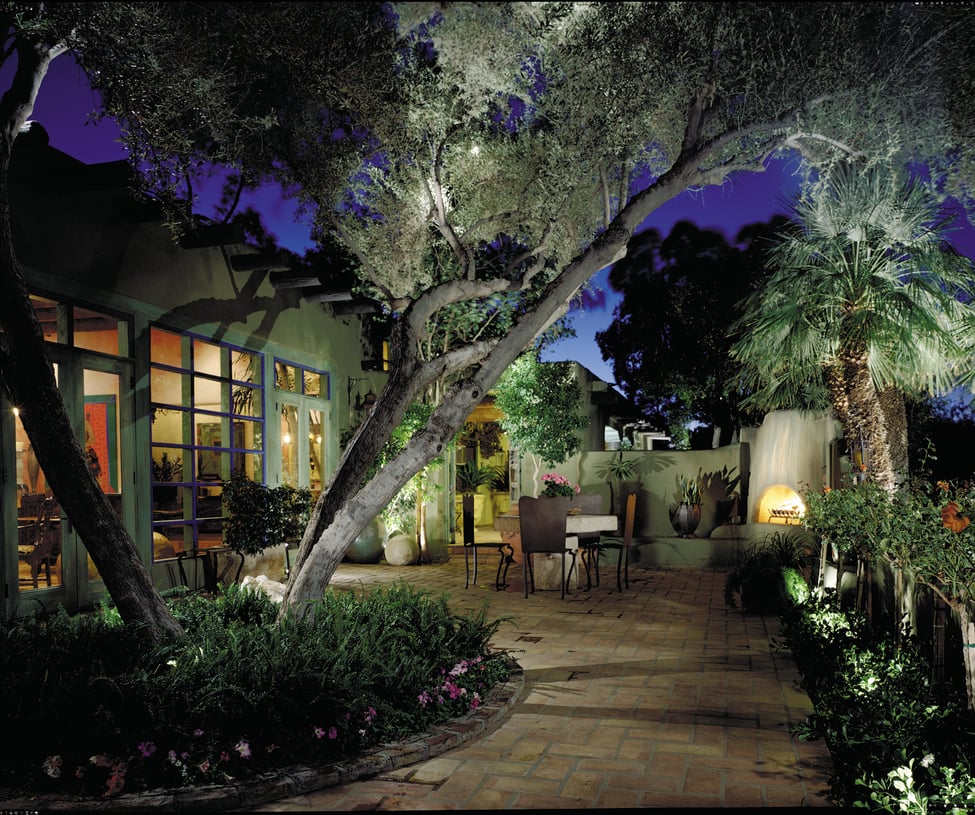
Yep. There are a lot of LED lamps available online today. And while those lamps are often available at a significant discount, there can be a substantial difference in quality. Horizon only sells products from quality lighting manufacturer partners (Vista, Unique, FX, Kichler & Brilliance) that make professional-grade, reliable products. There is a difference! See for yourself…

landscape_lighting_backyard.jpg

  1. Distributor Support – no matter where you buy, product quality and warranty issues can arise. When there is an issue with products bought online, there is often only an email address provided for you to use when seeking support. Great. But wouldn’t you prefer a living, breathing human being that is available to assist with everything, from troubleshooting to returns?
  2. Warranty & Longevity – Quality lighting manufacturers stand behind their warranty. So, the expectations behind a 5 year warranty and 35,000 hour life are real and supported. Cheap LED’s will commonly state they last for 20 years, but on the back of the box it will say “when run 3 hours a day”. Some even say not to run more than 5 hours at a time or they’ll burn out prematurely.  
  3. LED Binning – LED’s are grown more than created. As a result, their color temperatures (2700 Kelvin, 3000 Kelvin, etc.) are all over the board, so they must be sorted. This process is called binning, and it’s expensive. Quality manufacturers bin their LED’s, and as a result give consistent color temperatures. So 2700K is 2700K. Cheap online LED’s save money by skipping the binning process, and the result is an unprofessional, inconsistent color temperature, where 2700K can be +/- 500K. 
  4. Inconsistent Light Output (Lumens) – Quality manufacturers utilize photo-spectrometers to measure the output of their lamps. This is another quality control step that cheap LED manufacturers skip, which leads to inconsistent output across the lighting system, causing Mrs. Smith to ask why one light hits the top of her trees and the other doesn’t.
  5. Thermal Management (Heat Sink) – In order to generate a lot of light at a very low power consumption rate, LED’s “burn” very hot. This generated heat has to be managed, or dissipated, properly. Horizon’s professional quality LED lamps have this heat sink built in. Most cheap LED manufacturers provide sub-standard heat sinks, which can lead to premature failure and even fire.  
  6. Indoor/Outdoor/Enclosed Fixture Rated – The LED lamps sold at Horizon are designed and manufactured to be used outdoors in an enclosed fixture. Most of the lamps available online come in packaging that clearly states they are not intended to be used outdoors, or in an enclosed fixture. Using these lamps can lead to premature failure, and other issues.
  7. UL, CUL or ETL Listing – all of the LED’s lamps that Horizon sells are rated by one of these entities, which all uphold the same level of standards. Many online LED lamps are not rated/listed, and therefore are manufactured without having to adhere to any standards. This really should speak for itself; the standards are there for a reason.
  8. FCC Listing – All Horizon-sold LED lamps are FCC listed. Most online LED lamps don’t carry FCC clearance. Electronic products that aren’t FCC compliant can cause many kinds of issues, from opening a neighbor’s garage door or messing with Aunt Harriet’s pacemaker.
  9. Rated 8-15 or 8-25 volts – Horizon’s LED lamps are rated to operate consistently across a wide voltage range and maintain a constant light output across the range. Most cheap LED’s are not manufactured to meet these ranges, resulting in small voltage spikes that can cause early lamp failure and varying light output.


In our business relationships are important. You can rely on your relationship with Horizon to support you and your business every step of the way. Why risk your relationship with your client by installing inferior products to save a few bucks? Want to know more? Stop by your local Horizon store today.

Read More

Topics: Lighting, Construction, Outdoor Living

5 Tips to Get You Started in Landscape Lighting

Posted by Todd Kemink on Oct 20, 2015 12:58:00 PM

landscape_lighting_backyard

When competition is fierce and margins are slim, a good strategy to build your bottom line is to offer high margin services that complement your current service offerings.

One of the biggest opportunities for both construction and maintenance contractors is landscape lighting. Landscape lighting is easy to install and has a higher profit margin than almost any other landscape project.

In this article, we'll focus on 5 key tips to get you started.


Tip #1: Take Advantage of Free Training and Local Support

It’s easy to fear the unknown. In order to sell lighting, you have to first understand lighting. But don't worry. It's not rocket science and it’s extremely easy to get customers excited about it.

If you're new to lighting or want to stay current with the latest trends, there's lots of training and local support available. You can always attend a Horizon sponsored training event. But if you don't want to wait until dozens of your local competitors are getting the same training as you, contact your local Horizon representative and ask for assistance. We're ready to show you how to design, install, and sell lighting systems. Our team receives constant training on lighting and can even help you coordinate demos with local reps from the top landscape lighting manufacturers.


Tip #2: Be the Expert

One of biggest mistakes you can make is to hand a homeowner a lighting catalog full of 100s of different fixtures and expect them to know enough to place an order. The customer should be involved, but don't make them do the heavy lifting! Don't just give them a catalog and say, "Here you go, Mrs. Jones. Tell me what fixtures you like and where you would like them."

This isn’t a successful way to sell landscape lighting and typically leads to a less than stellar end result. 

Be the expert and guide the customer through the process. If they have a special request, bring the information to them. Ask questions until you understand the customer's wants, needs, and budget. Then show them the fixtures you recommend and where they should be installed ... which leads us to Tip #3, the most important tip.


Tip #3: Demos Sell Outdoor Lighting

It’s much easier to get a customer excited about a lighting system when you show them vs tell them. Humans are very visual creatures. Showing customers what you plan to do will help them focus on the effect lighting produces and not on the individual fixtures. Plus, you'll demonstrate your expertise and gain their trust in the process.

You don’t have to demonstrate the entire job. Focus on a key area. Depending on the size and orientation of the site, the best area to demo could be the front yard, the back yard, the front of the house, or a natural gathering area for evening entertainment.

Plain and simple, demos sell product and they are quick and easy to perform. Jeff Vachter, a Horizon BDR based in Oregon, recently reported that "I'm currently setting up a demo once a week for my customers and we're getting a 90% sale rate."


Tip #4: Install Wire during Irrigation Installation

Installing irrigation in a new backyard? Go ahead and install wire while the trench is open, even if you haven’t sold the lights yet. The small cost you incur from the wire is minimal to the labor cost of digging up the dirt again. Even if the customer doesn't move forward with the lighting until a later date, you'll effectively be selling the lighting as a package and significantly improving your bottom line.


Tip #5: Don’t Forget about Previous Customers

Many contractors get tunnel vision and spend too much of their energy constantly battling and fighting for new clients.

While you should always be looking for new business, don't forget to look back too. If you're like most contractors, you have years of satisfied customers who have never had lighting or have an older system. With the many advancements in LED, the time is perfect to update or upgrade their existing lighting system.


Find your local Horizon

Read More

Topics: Lighting

How to Calculate Voltage Drop in LED Outdoor Lighting Systems

Posted by Ryan Moore on Aug 28, 2013 4:51:00 PM

Efrain Ramirez, Lighting BDR for Horizon, shows how to choose the right voltage tap on your transformer by calculating the total voltage drop throughout the lighting system.

Video Transcript

Hello, my name is Efrain Ramirez, Lighting BDR for Horizon, and your next period of instruction is going to be on voltage drop.

As you can see here, we’re going to be calculating voltage drop on an LED Hub Method. Now to do that on the bottom left hand corner circled in red is the formula for your voltage drop calculations.

VD = ((L x W)/WC) X 2

Now let me go over that. The “L” represents length of the wire times your wattage. Dividing by your wire constant. Times 2.

Now your wire constant, as you can see on your chart on the right hand side, when using 12 gauge, your wire constant will be 7500. 14 gauge is 3500. Now these are the two gauges that we’re going to use in this example here.

So as you see, that on your home run, your 12/2 is 150 foot times 75 Watts, which is your total load on this one home run. That equals 11,250. You take that number and divide it by your wire constant, which is 7500, it gives you 1.5. Multiply that times 2 and you get a voltage drop of 3.

Once you’re done doing your voltage drop on your whole entire system, you calculate individual legs.

As you’ll see here circled in red, you have 50 foot of 14/2 times 25 Watts equals 1250. Divide that by your wire constant, which is 3500. It gives you .3571. Times 2 is .71 voltage drop.

The same thing here. We’re using the same gauge wire. Same distance. So if you have 50’ x 25w = 1250. Divide that by the wire constant 3500. Gives you .3571. Times 2 is .71 voltage drop on that leg.

Now your top leg circled in purple, same exact calculations. You have 50 foot times 25 watts of load equals 1250. You divide that by your wire constant, 3500, comes out to .3571. Times 2. It’s .71 voltage drop there.

Once you calculate everything, you add all your calculations up, which gives you 5.13 of total voltage drop. Now once you’ve done that, you simply add that to 12 volts, which that you want at your fixtures. So you’re going to be utilizing 12 volts.

See at the very bottom left, we have added all of your voltage drop calculations. It gives you 5.13 Voltage Drop. And on your far right, you’ll be utilizing your 17 Volt Tap on your transformer.

That concludes my period of instruction on Voltage Drop.

Read More

Topics: Lighting

LED Wiring Steps for Outdoor Light Fixtures

Posted by Ryan Moore on Aug 28, 2013 3:34:00 PM

Efrain Ramirez, Lighting BDR for Horizon, outlines important steps and procedures to follow when setting up an outdoor LED lighting system.

Video Transcript

Hello, my name is Efrain Ramirez, Lighting BDR for Horizon. In this period of instruction, I’m going to be telling you about wiring steps and procedures.

This period of instruction is going to be over LED steps and procedures using the LED Hub Method.

Home run is a circuit ran from your transformer straight to your hub or the first fixture. When running your home run, use 12/2 wire from your transformer straight to your hub or your first fixture.

Laterals or legs. That’s a wire from your hub or the first fixture to five fixtures or less. So don’t exceed five fixtures on each leg.

Now you can daisy chain up to five fixtures per leg from the hub or first fixture, but make sure you don’t exceed 50 foot. This is the 5/50 rule.

So you can run as many legs allowable per home run but make sure you calculate the voltage drop. Down below there’s a formula there and don’t exceed the home run wire capacity

VD = ((L x W)/WC) X 2

Now for instance, here we’re using 12 gauge wire. Don’t exceed 192 watts. That’s 80% of your load.

Last, check your voltage at the hub or the first fixture. Ensure that the proper voltage is between 12v and 15v.

And importantly, when designing wire runs and selecting a transformer, ensure that the voltage taps available on the transformer are sufficient. Make sure you have a high enough voltage tap on that transformer to compensate for the voltage drop.

Read More

Topics: Lighting