5 Tips for Choosing a Fertilizer

Posted by Mary Martinez on Jun 30, 2017 8:38:59 AM

Does the brand of fertilizer you use really matter? Short answer is yes, it does. There is a lot more than just N-P-K that makes up a bag of fertilizer. There are a few important things you should look for when selecting a brand of fertilizer.

EEF (Enhanced Efficiency Fertilizer)

The Association of American Plant Food Control Officials (AAPFCO) defines EEFs as products with characteristics that allow increased plant uptake and therefore reduce potential nutrient losses to the environment (e.g., gaseous losses, leaching, or runoff) when compared to an appropriate reference fertilizer that does not contain additives. Controlled or slow-release fertilizer provide solutions that contribute to environmental responsibility:

  • Reducing N volatilization and slowing the conversion to nitrate means more N remains available to plants
  • With gradual metering of N, uptake by the plant is optimized; less is underutilized, reducing potential loss to the environment
  • The result is more efficient nutrient use, meaning your customers can apply less N, which not only benefits the environment; it helps to preserve this vital resource as well

TurfGro fertilizers have several slow release fertilizer options that include technology such as Duration and XCU.

Micronutrients

Micronutrients are essential for soil health and plant growth. Soil analysis shows micronutrient deficiency is common in soil and can be a contributing factor to pest problems and slow germination. If a fertilizer contains one of the common micronutrients (boron, copper, iron, manganese, zinc, magnesium, calcium & sulfur) they will be listed on the label after NPK.    

What makes TurfGro fertilizer different from other brands is that it is manufactured and blended locally in market. This allows us to design the formulation to meet the soil needs of that market, adding micronutrients commonly missing.

What’s in the Bag?

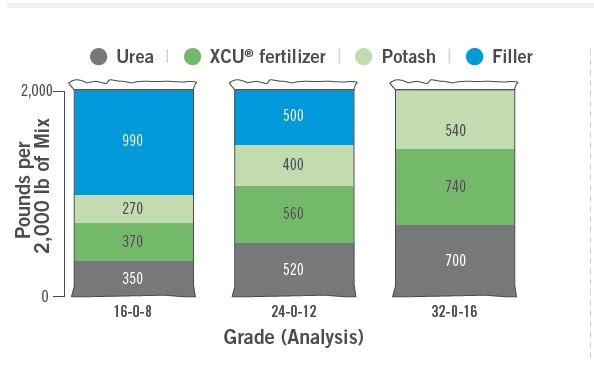
Typical fertilizer is made up of four components: urea, nitrogen, potash and filler. The first three components provide nutrients to the turf, while “filler” normally doesn’t offer any value. The amount and content of that filler can influence the quality of that turf.

Amount – the more urea, nitrogen and potash in the blend, they less need for filler. So when you select a fertilizer with a higher NPK, you will have less filler in the bag. In addition to NPK, micronutrients like calcium and magnesium reduce the amount of filler blended in the fertilizer.

Content – most higher end fertilizer will use biosolids or other organic-based product as filler. Most less expensive products use limestone, which provides zero nutrition to the soil. It’s less expensive, but you are still paying for product that can’t be used by the turf.

When needed, Horizon’s TurfGro fertilizer commonly use biosolids as the basis for filler, ensuring a higher value product for you.

Whatsinthebag.jpg

Pellet Size

In blended fertilizers, the individual particles remain separate in the mixture, and there is a potential for segregation of the nutrients. This problem can be reduced by using materials that are the same size. Properly made blends are generally equal in effectiveness to other compound fertilizers.


You can always find a cheaper bag of fertilizer. But when you look overall cost of the application you will find that a cheaper bag will normally cost you more in the long run. Following a program and using a premium fertilizer like TurfGro will help you deliver healthy, green turf to your client season after season.

Read More

Topics: Maintenance, Fertilizer

How to Find a Water Leak with the Help of the Water Meter

Posted by Bob Franchetto on May 18, 2017 8:53:09 AM

When was the last time you checked your customer’s water meter? If it’s within the last 30 days, that’s great. But if you’re not in the habit of regularly checking your water meters, there’s a good chance you’re missing a leak.

The water meter is an overlooked tool that helps you quickly detect if there’s a water leak somewhere in your customer's irrigation system. Horizon’s Bob Franchetto has put together a few tips and a video to show you how to find and correct leaks with the water meter.


Is There a Leak?

When you’re using the water meter to check for leaks, we’re not concerned about the large dial. When the large dial is moving, we’ve got a big leak. What you want to find is the low flow indicator. Sometimes it’s blue, sometimes it’s a little red triangle.

If the low flow indicator is moving when the irrigation system is shut off, there’s a leak somewhere in the system.


describe the image


Finding the Leak

Step 1: Check if water is leaking.

Where the water is leaking is important. If the water is leaking on the city side, your customer won’t be billed for that water, but it still needs to get fixed. Leaks on the city side are the city’s responsibility and the city should be contacted to arrange service.

When the water is leaking on your customer’s side of the property, your customer is paying for it and it’s your responsibility to fix.

Step 2: Check the system from the meter to the valves.

If the water meter is running with the irrigation system turned off, then there is a leak between the meter and the valves. If the meter is running with the backflow turned off, you have just bypassed the valve and isolated the problem to the main. Your leak is between the meter and the backflow.

Step 3: Check if water is leaking out of the sprinkler heads.

When you have water leaking out of the sprinkler heads on a flat surface, you have a weaping valve. The valve is leaking. Let’s get it fixed or replaced.

And if the sprinkler heads are leaking on a sloped surface, you may need to install check valves. Without check valves, each time the system shuts off, every bit of water from the valve to the head is going to leak out. It’s a classic example of low head drainage.

The problem further multiplies when you cycle and soak the slope. If you don't have a check valve in the head when you cycle and soak, every cycle will produce additional low head drainage.

As purveyors of water, it’s our job to help our customers better manage their water usage. In many cases, we can dramatically improve an irrigation system’s efficiency with a few simple tweaks. It's the stuff we walk by every single day and don't pay attention to, but it’s easily fixed and it can save a significant amount of water.


Click Here for More Drought Solutions


Read More

Topics: Maintenance, Water Conservation, Construction, Drought Solutions

Which Roundup is Right for Me?

Posted by Mary Martinez on May 9, 2017 2:00:00 PM


The Right Choice!

With rains subsiding and weeds flourishing it's prime Roundup season.  But how do you know which formulation is right for you?  Don't let price be your only criteria! 

While they are all glyphosate products, each Roundup has particular features that makes it better for different situations.  This chart breaks it down and helps you decide if you need QuikPro, ProMax or Custom. 

The Right Tool for the Job:

Which Roundup is the right solution for you?

 Roundup-which one should I use_Page_1.jpg


Bottom Line:

And of course every purchase of a Monsanto Roundup Product is backed by True Blue Advantage, with 24-hour support whatever your need. 

Horizon has a complete selection of all Roundup products!  Drop by your local store today. 


Read More

Topics: Maintenance

Backpack Sprayers - internal piston or diaphragm pump?

Posted by Mary Martinez on Jan 30, 2017 4:54:12 PM


If you are reading this blog, you've probably always used a diagraphm pump backpack sprayer and are ready to disagree with everything in this article.  We get it!   You've grown to like the blue stains on the back of your shirt. 

But if you are interested in breaking some myths about backpack sprayers, then read on.  And while diaphragm units are a great option, we've got some compelling reasons to consider an internal piston pump unit instead.


Five Arguments for the Internal Piston Pump

1. Leaks

Well this one is pretty straight forward - the pump is INSIDE the tank and won't leak on your backside.  Diaphragm pumps are prone to leakage and lead to "blue butt".

2.  Agitator

Internal piston pumps have an agitator below the piston chamber so powdered chemicals like Roundup QuikPro are constantly mixed.  Most diaphragm pumps don't have an agitator so chemicals can settle out.

3.  Clogs

This is probably the biggest myth about internal piston pumps - they clog when using powdered chemicals.  The truth is piston pumps can clog if the unit has NO agitator, or if agitator is located ABOVE the piston chamber. A piston unit with an agitator BELOW the chamber will NOT clog when using Roundup QuikPro. 

4. Pressure

Internal piston pumps have more power, so they can spray at higher pressure and reach further distances. 

5.  Costs

At Horizon our internal piston pumps are offered at a lower cost than the diaphrgam pump so you can get a better unit at a better value. 


Bottom Line:

If you’re ready to ditch the blue butt and give the Internal Piston Pump a try, drop by your local Horizon store and check out our complete selection of Jacto & Field King professional backpack sprayers.

Want to learn more?  Click here http://bit.ly/2jo6hIl


Read More

Topics: Maintenance

Tricks and Tips to Applying Post-Emergent Herbicides

Posted by Mary Martinez on Sep 22, 2016 8:00:00 AM

Applying post-emergent herbicides in the fall is an important step in controlling difficult perennial weeds that would otherwise reemerge in the spring. While using a pre-emergent herbicide is very effective in preventing new annual weeds, which is also an important weed control measure for those weeds which reproduce mainly by seed, it will not take care of those weeds with spreading roots. In other words, effective weed control is a two-pronged approach, and there are some reasons to focus on post-emergent applications in the fall.

Timing is Everything

In order to effectively control perennial weeds, it is important to understand their life cycle. While spring applications of post-emergent herbicides have the advantage of taking out weeds before they have a chance to build up a thick, waxy surface that is difficult to penetrate, the down side is that the herbicide is not always carried down to the roots, so the weeds can regrow. In the fall on the other hand, the weeds are carrying their own sugars down to their roots for winter storage, so a post-emergent herbicide application will be carried right down to the root with the sugars – killing the weed for good.

Let it Rest

Avoid mowing the turf for two to three days before and after applying a post-emergent herbicide.  Because the herbicide is absorbed through the blades of the weed, having longer, bigger leaves (more surface area) is essential to success.  If you mow too quickly after application, you risk removing the herbicide before it can reach the roots.  Turn irrigation off, and do your best to minimize disturbances to the turf so that the product can be absorbed in a consistent manner.

Not too Hot, Not too Cold

The ideal temperature for applying post-emergent herbicides is between 60 and 85 degrees - when most weeds are actively growing.  Too cold and the plant goes dormant and cannot move the chemical to its roots.  Too hot and you risk volatization of the herbicide in high heat.

Liquid or Granular?

In general, liquid products tend to be more effective than granular.  The liquid formulation absorbs into the leaf tissue and moves through the plant more quickly than granular.  Plus they are normally rain-fast in 3-6 hours.  But a “weed and feed” granular product is convenient and efficient, eliminating the need for a second application and reducing labor costs.  If you choose a granular product, apply in the morning when turf is damp so the product will stick, and avoid irrigation and disturbances for at least 24 hours after application. 

Remember, post-emergent herbicides can cause considerable damage to the desirable turf and plants on the property, so be sure to read the label before applying. Also, take every precaution to minimize drift or runoff. 

Your local Horizon store has an extensive selection of herbicides in a variety of sizes including pints, quarts, gallons and 2.5 gallons.  To learn more, contact your local Horizon store. 
Read More

Topics: Maintenance

How to Select the Right Lawn Spreader

Posted by Mary Martinez on Sep 19, 2016 11:11:21 AM

Selecting the right spreader for a fertilizer or seed application isn’t that complicated.  But avoiding some common misperceptions can help ensure you get the right machine for the job. 

Size

How big of a hopper do you need?  This is one of the most common misunderstandings when buying a lawn spreader.  50-pound hopper for a 50-pound bag of fertilizer, right?  Wrong!  50-pound spreaders have a high risk of spill since a full bag of product goes right to the top.  They are light-duty units definitely not fit for the landscaper who uses them on a regular basis. 100-pound spreaders on the other hand, are difficult to push when full at a consistent pace necessary to achieve uniform results. A 70-pound spreader is the ideal size when using 50-pound bags.  Not only do you avoid spillage, but you can refill product before it gets all the way to the bottom.

Material

Most commercial lawn spreaders come in either stainless steel or epoxy powder coated plastic.  The biggest concern for landscape professionals regarding spreaders is rust on the frame, caused by failures to wash off abrasive materials and store inside away from the elements.  And while more expensive, the stainless steel spreader will withstand rust better than other material, which means it will last longer and give you a better return on investment.  Durable pneumatic tires are also important; lower quality tires can create a choppy ride and ultimately an uneven application.

Product Waste

Having a quality spreader with multiple attachments will can help you better manage how much product goes out on each application, lowering your cost of goods and improving profitability.  Side-deflectors deliver a targeted, accurate spread and prevent material from landing on sidewalks, driveways and streets.  This eliminates product waste and ultimately saves you money. Another helpful attachment is a hopper cover, which protects material from rain or snow during application and reduces the risk of a spill.

Don’t Forget to Calibrate!

Calibrating your spreader for every application is the only way to ensure you are applying fertilizer and pesticides at the correct rate, also reducing your overall cost of goods.  If you do not calibrate you risk applying too much or too little product, risking serious injury to your turf or disappointing results.  Calibrating your spreader is easy to do and normally takes about 5 minutes.  To learn more on calibrating your fertilizer, watch our “how to” video here. http://blog.horizononline.com/blog/how-to-calibrate-a-fertilizer-spreader 

Want to learn more about the spreaders available at your local Horizon?  Call your local Horizon store, or click for an overview on the new Prizelawn Spreader selection. http://connect.horizononline.com/prizelawn-spreaders

Read More

Topics: Maintenance, Fertilizer

The Emerald Ash Borer Has Arrived in Texas!

Posted by Ryan Moore on Jun 28, 2016 2:53:46 PM

In May 2016, officials from the U.S. Forest Service and the Texas A&M Forest Service confirmed that an unwelcome visitor had finally made its way onto Texas soil when they trapped 4 adult emerald ash borer (EAB) beetles just south of Karnack in northeast Texas.

First identified in Michigan back in 2002, these beautiful but destructive pests with origins in Asia have worked their way across 25 states (Texas makes 26), leaving millions of dollars worth of destruction in their wake.

emerald_ash_borer_1.jpg
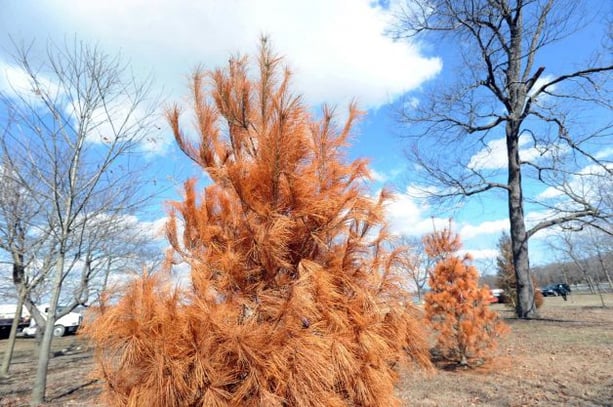
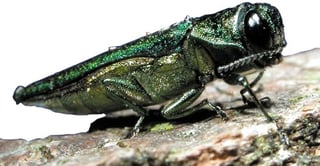
Because emerald ash borers are not native to the U.S., our ash trees don't have any natural defense mechanism against this invasive insect; and once an ash is infected, it generally dies within 2 to 3 years if it's not treated early and effectively. What makes the situation even worse is that infestations often aren't identified until it's too late. And because they can easily be transported in firewood and wood products, it's tough to predict how quickly they will spread across Texas.

The good news is that the Texas A&M Forest Service has been actively looking for this pest since 2012 when it started deploying and monitoring traps during the spring and summer months, the peak period for EAB emergence and movement. It should also be noted that there have been no confirmed infestations in Texas yet, but it is certainly time for you to start talking to customers about their treatment options.

There are 7 species of ash trees in Texas (Green, White, Caroline, Texas, Water, Mexican, and Arizona Ash) and although they make up less than 5% of rural Texas forests, ash trees often appear in large numbers within urban communities. Austin, TX alone has millions of ash trees!


Identifying an Emerald Ash Borer Infection

emerald_ash_borer_damage.jpg
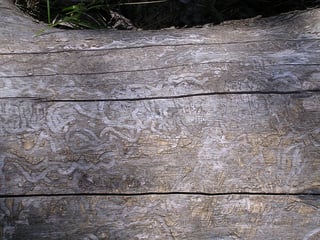
Ash trees with low population densities of EAB often exhibit little evidence of infestation. It's also difficult to identify EAB damage in the winter because they are still in the larvae stage of their lifecycle, feeding on the phloem of the tree.

As EAB larval population increases, the movement of nutrients becomes more and more disrupted, eventually leading to symptoms such as:
- Dead branches near the top of the tree,
- Leafy shoots sprouting from the trunk,
- Barks splits that expose larval galleries.

If you see significant woodpecker activity, that could be a sign that the ash tree is infested by EAB. As spring and summer arrive and the lifecycle progresses into adulthood, you'll also notice D-shaped exit holes in the tree's bark.


Recommended Treatment for Emerald Ash Borers

One of the benefits of Texas being the 26th state invaded by EAB is that there's a solid 10 years of research on the best methods for controlling this pest. Effective treatments have been identified!

The most effective treatment options have proven to be systemic insecticides, which can be applied to the base of the trunk or sprayed on the bark.

Horizon's recommended treatment for emerald ash borers is Zylam, a liquid form of dinotefuran, which provides exceptional control and can be used as a drench, soil injection, or bark banding application. If you are planning on applying Zylam as a bark banding treatment, we further recommend utilizing SCRIMMAGE (a organosilicone surfactant blend) which increases Zylam's effectiveness as it helps the chemical stick to the tree.

Have questions about the emerald ash borer? Contact your local Horizon branch in Texas. We'll help you get a head start on this pest!


  Free Landscape Maintenance Guide - Click Here

Read More

Topics: Maintenance

How to Revive a Tree Dying from Salt Stress

Posted by Ken Mauser on Nov 6, 2015 2:17:05 PM

We are at the end of another hot, dry summer. Redwoods, pines and other salt sensitive trees have taken another beating.

What we all need is a good wet winter. But if your trees have a significant buildup of salt, all the water in the world will not help. When salt buildup is severe, water remains unavailable to the roots and trees slowly die of thirst.

Redwoods and pine trees are especially sensitive to salts. Salts weaken the trees and can lead to dieback or death. These trees are sensitive to salts in general (which alone can cause a certain amount of damage), but the main culprits that cause most of the damage and death are carbonates and sodium.

Let’s look at how this chain reaction occurs.


The Chain Reaction that Ends in Tree Death

Bicarbonate (HCO3) is a salt that's common in irrigation water. When bicarbonate gets into our soils and dries out, it releases the hydrogen (H), replaces it with calcium (Ca), and becomes calcium carbonate (CaCO3) - an insoluble mineral crystal that is known to plug pore spaces. Pore spaces are critical to tree health because they allow both air and water to reach the root system.

The formation of calcium carbonate is the first step in the declining health of these trees.

The next step is the inability to leach. Because the calcium carbonate has plugged the pore spaces, water can’t move through the soil profile as it needs to. Leaching or flushing becomes harder and harder. With the lack of cleansing through flushing, sodium begins to build up and soon the trees begin to pull that sodium up. Sodium is quite mobile and it moves to the outside edges of the leaves, resulting in sodium tip burn or firing around the edges of the leaves.

As the sodium buildup continues, you'll see stems, twigs, branches and limbs begin to die back. If you ignore the signs and allow the buildup to continue, it could very well lead to the death of the tree.

So, what do we do? What can be done?  


Revitalizing Salt Damaged Trees with a Drench Application 

One of the best ways to revitalize salt damaged trees is with a drench application. Drenching helps with salt issues and releases the sodium from the soil particles, unblocking the soil pores. This allows the water and salts to flush and moves the salt away from the root system.

To create 100 gallons of drenching solution, you'll need:
 - ½ gallon of Blast Sprayable (for the calcium carbonate)
 - ½ gallon of Caltrisal ST (for the sodium)
 - A liquid calcium product of your choice (for sodium exchange)
 - ½ gallon of Sixteen90 (to move the water deeper)

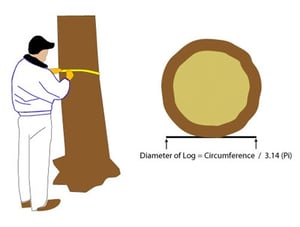
The application rate is 10 gallons of solution per 12” of diameter at breast height (4.5' above the ground). If you don't have a diameter measuring tool, measure the circumference and divide by 3.14. So if you're working with a redwood or pine tree with a 24" diameter, you'll need 20 gallons of solution.

This application should be made within the dripline of the tree branches. And it should be made in November so the treatment is down before the rainy season gets started. That way you can take advantage of every drop of rain possible. 

For more information about the program or the products, please contact your local Horizon Store or Horizon BDR.

About the Author:

Ken Mauser is a Consulting Agronomist who has served as Aquatrols' Territory Manager in the Western United States for more than 20 years.

Read More

Topics: Maintenance

How to Calibrate a Fertilizer Spreader

Posted by Nick diLorenzo on Oct 1, 2015 6:03:00 PM

If maintenance services are a significant source of revenue for your business, one of the quickest ways to improve your profit margins is to consistently use the proper amount of product on each and every job.

In this FAQ, Nick diLorenzo, Horizon's National Sales Manager for Landscape Products, shares a simple 3 step method that will help you quickly calibrate your fertilizer spreader.

Video Summary

In less than 5 minutes, you can know exactly how much fertilizer you need to apply and make sure your fertilizer spreader is set up to apply that right amount of product.

3 Things You Need to Get Started:

  1. Fertilizer Spreader - To properly measure out the test area of 1000 sq ft, you need to know the effective width of your fertilizer spreader. The effective width is how wide the spreader throws the fertilizer.
  2. Scale - To weigh the material.
  3. Calibration Tray, Broom, or Bucket - To measure or capture the material you put out in the test area. Calibration trays capture the fertilizer during the test, which allows you to get an extremely accurate measurement. If you weigh your material before and after your test application, a bucket can also get you a very accurate measurement. A broom allows you to sweep up the material within the test area for weighing, but is usually the least accurate option of the 3.


The 3 Steps of Fertilizer Calibration

Step 1: Calculate how much fertilizer you need.

To properly calibrate your spreader, you need to do the math first and then get out into the field and do the legwork. To calculate how much fertilizer you need to apply, you have to know:
- The application rate,
- The target nutrient,
- The formulation of your fertilizer.

So if you have a contract that states you need to use 1 lb of nitrogen per 1000 sq ft and you're using a fertilizer with an NPK of 24-2-9, divide the 1 lb of N by .24 (the percentage of nitrogen in the bag as a decimal). In this example, you'll need to apply 4.16 lbs of fertilizer to get 1 lb of N per 1000 sq ft.


Step 2: Find out how much fertilizer you're currently using.

Calibrating a Fertilizer Spreader
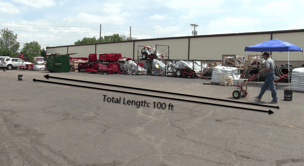
To test your spreader's current application rate, measure out an area of 1000 sq ft.

Coverage Area = Length x Effective Width

The easiest way to measure out your test area is to divide your coverage area by the effective width of your spreader. So if you want to cover 1000 sq ft and the spreader has an effective width of 10 ft, you'll need to walk 100 ft.

Weigh your fertilizer before and after your test application to determine how much fertilizer you're currently applying.


Step 3: Adjust the spreader's setting until the application rate is within 1% of the amount calculated in Step 1.

Compare the amount of fertilizer you calculated in Step 1 to the amount of fertilizer your spreader actually used during the test application. Adjust the setting on the spreader up or down accordingly. Once you're happy with the setting (we recommend within 1%), write it in your log book!


New Call-to-action
Read More

Topics: Maintenance, Fertilizer

Lowering Product & Labor Costs at 140+ Properties (Case Study)

Posted by Ryan Moore on Jul 2, 2015 4:18:00 PM

coast_landscaping_logo_2About Coast Landscaping Inc.

Coast Landscaping Inc. has been a leader in all areas of water and landscape management since 1978 and works closely with both management firms and municipalities. They serve over 140 properties throughout California through their two divisions: Landscape Construction and Interior/Exterior Landscape Maintenance. 

Coast Landscaping Inc. is one of the few companies that has acquired both the State of California small business status (SBE) as well as the City of San Diego emerging Local Business Enterprise (ELBE) status. Their experienced team serves, but is not limited to, general contractors, municipalities, homeowner associations (HOAs), owner associations and commercial units.  

The Problem

Because of their size and span, Coast Landscaping was experiencing problems with consistency in their product applications. With 140+ properties being managed by a team of supervisors, different products were being used on different schedules, leading to inconsistent results.

Some supervisors were using standard N-P-K fertilizer, resulting in more frequent applications and higher labor costs. Others were also splitting their chemical applications from their nutrition, again increasing labor costs and ultimately reducing product effectiveness.

The Solution

Coast Landscaping Inc. worked with Horizon’s local Business Development Representative Neb Keeton to create a plan that would fit their clients' needs and circumstances, while limiting the use of chemicals and the need for additional applications. The new landscape maintenance schedule also needed to be financially responsible, especially when it came to managing some of their large commercial clients.

By moving to the TurfGro™ Extended Feed Fertilizer and the TurfGro™ Weed and Feed with Surge, Coast was able to achieve their goals of lowering chemical usage and labor costs while increasing client satisfaction. In addition, Neb helped them execute the new plan by providing informative materials for employee safety training and MSDS lists.

The Result

Since the conversion, Coast Landscaping Inc. has been able to use smaller application rates with less frequency, reducing overall costs especially cost per application. They have been able to pass those savings on to their clients, resulting in more satisfied and loyal customers.

The TurfGro Extended Feed Fertilizer has produced healthier looking plant material, while the pre-emergent weed control has improved appearances while helping reduce labor costs. Tyler Mason, Coast Landscaping's Operations Coordinator, noted, “By incorporating pre-emergent into the fertilizer and the aid of slow-release fertilizers we have been able to increase the effectiveness of the fertilizer while eliminating excess growth, increasing mowing efficiency, and building a healthier root mass.”

Want to Lower Costs and Achieve More Consistency at the Sites You Manage?
Contact one of Horizon's local Business Development Representatives!
Read More

Topics: Maintenance, Fertilizer